
Only showing posts tagged with "C#"
Async/Await - The Edge Cases and Unit Testing Presentation
October 03, 2012 12:29 PM by Daniel Chambers

Tonight I gave a short presentation at Devevening titled “Async/Await – The Edge Cases and Unit Testing”. Here’s the abstract:
In this talk we'll look at the new async await feature in C# 5, but we'll go beyond the typical toy examples and look at edge cases like exception handling, task cancellation and how we can approach unit testing asynchronous methods.
I’ve uploaded the source code and slides to a BitBucket repository, so for those who want to inspect the examples at their own leisure, please clone away:
- Source code (specifically revision 394d1e3cf9f5 was used in this talk)
- Presentation slides
I hope to make an extended version of the talk and present that at a future user group; I’d like to cover things in a little more detail, look at the history of async over the life of the .NET Framework, cover unit testing a bit more thoroughly, and maybe even take a peek under the covers at what the compiler generates when you write an async method. Stay tuned!
More Lessons from the LINQ Database Query Performance Land
July 19, 2011 2:00 PM by Daniel Chambers (last modified on July 19, 2011 2:20 PM)
Writing LINQ against databases using providers like LINQ to SQL and Entity Framework is harder than it first appears. There are many different ways to write the same query in LINQ and many of them cause LINQ providers to generate really horrible SQL. LINQ to SQL is quite the offender in this area but, as we’ll see, Entity Framework can write bad SQL too. The trick is knowing how to write LINQ that doesn’t result in horribly slow queries, so in this blog post we’ll look at an interesting table joining scenario where different LINQ queries produce SQL of vastly different quality.
Here’s the database schema:
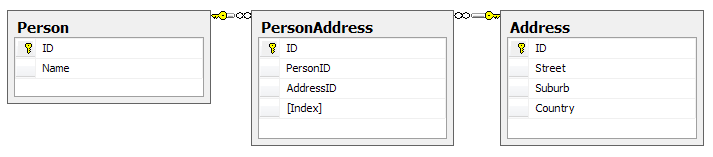
Yes, this may not be the best database design as you could arguably merge PersonAddress and Address, but it’ll do for an example; it’s the query structure we’re more interested in rather than the contents of the tables. One thing to note is that the Index column on PersonAddress is there to number the addresses associated with the person, ie Address 1, Address 2. There cannot be two PersonAddresses for the same person with the same Index. Our entity classes map exactly to these tables.
Let’s say we want to write a query for reporting purposes that flattens this structure out like so:

Optimally, we’d like the LINQ query to write this SQL for us (or at least SQL that performs as well as this; this has a cost of 0.0172):
SELECT p.Name, a1.Street AS 'Street 1', a1.Suburb AS 'Suburb 1', a1.Country AS 'Country 1',
       a2.Street AS 'Street 2', a2.Suburb AS 'Suburb 2', a2.Country AS 'Country 2'
FROM Person p
LEFT OUTER JOIN PersonAddress pa1 on p.ID = pa1.PersonID AND pa1.[Index] = 1
LEFT OUTER JOIN PersonAddress pa2 on p.ID = pa2.PersonID AND pa2.[Index] = 2
LEFT OUTER JOIN [Address] a1 on a1.ID = pa1.AddressID
LEFT OUTER JOIN [Address] a2 on a2.ID = pa2.AddressID
One way of doing this using LINQ, and taking advantage of navigation properties on the entity classes, might be this:
from person in context.People
let firstAddress = person.PersonAddresses.FirstOrDefault(pa => pa.Index == 1).Address
let secondAddress = person.PersonAddresses.FirstOrDefault(pa => pa.Index == 2).Address
select new
{
    Name = person.Name,
    Street1 = firstAddress.Street,
    Suburb1 = firstAddress.Suburb,
    Country1 = firstAddress.Country,

    Street2 = secondAddress.Street,
    Suburb2 = secondAddress.Suburb,
    Country2 = secondAddress.Country,
}
However, using LINQ to SQL, the following SQL is generated (and its cost is 0.0458, which is nearly three times the cost of the SQL we’re aiming for):
SELECT [t0].[Name], (
    SELECT [t3].[Street]
    FROM (
        SELECT TOP (1) [t1].[AddressID] FROM [PersonAddress] AS [t1]
        WHERE ([t1].[Index] = 1) AND ([t1].[PersonID] = [t0].[ID])
        ) AS [t2]
    INNER JOIN [Address] AS [t3] ON [t3].[ID] = [t2].[AddressID]
    ) AS [Street1], (
    SELECT [t6].[Suburb]
    FROM (
        SELECT TOP (1) [t4].[AddressID] FROM [PersonAddress] AS [t4]
        WHERE ([t4].[Index] = 1) AND ([t4].[PersonID] = [t0].[ID])
        ) AS [t5]
    INNER JOIN [Address] AS [t6] ON [t6].[ID] = [t5].[AddressID]
    ) AS [Suburb1], (
    SELECT [t9].[Country]
    FROM (
        SELECT TOP (1) [t7].[AddressID] FROM [PersonAddress] AS [t7]
        WHERE ([t7].[Index] = 1) AND ([t7].[PersonID] = [t0].[ID])
        ) AS [t8]
    INNER JOIN [Address] AS [t9] ON [t9].[ID] = [t8].[AddressID]
    ) AS [Country1], (
    SELECT [t12].[Street]
    FROM (
        SELECT TOP (1) [t10].[AddressID] FROM [PersonAddress] AS [t10]
        WHERE ([t10].[Index] = 2) AND ([t10].[PersonID] = [t0].[ID])
        ) AS [t11]
    INNER JOIN [Address] AS [t12] ON [t12].[ID] = [t11].[AddressID]
    ) AS [Street2], (
    SELECT [t15].[Suburb]
    FROM (
        SELECT TOP (1) [t13].[AddressID] FROM [PersonAddress] AS [t13]
        WHERE ([t13].[Index] = 2) AND ([t13].[PersonID] = [t0].[ID])
        ) AS [t14]
    INNER JOIN [Address] AS [t15] ON [t15].[ID] = [t14].[AddressID]
    ) AS [Suburb2], (
    SELECT [t18].[Country]
    FROM (
        SELECT TOP (1) [t16].[AddressID] FROM [PersonAddress] AS [t16]
        WHERE ([t16].[Index] = 2) AND ([t16].[PersonID] = [t0].[ID])
        ) AS [t17]
    INNER JOIN [Address] AS [t18] ON [t18].[ID] = [t17].[AddressID]
    ) AS [Country2]
FROM [Person] AS [t0]
Hoo boy, that’s horrible SQL! Notice how it’s doing a whole table join for every column? Imagine how that query would scale the more columns you had in your LINQ query! Epic fail.
Entity Framework (v4) fares much better, writing a ugly duckling query that is actually beautiful inside, performing at around the same speed as the target SQL (0.0172):
SELECT [Extent1].[ID] AS [ID], [Extent1].[Name] AS [Name], [Extent3].[Street] AS [Street],
       [Extent3].[Suburb] AS [Suburb], [Extent3].[Country] AS [Country], [Extent5].[Street] AS [Street1],
       [Extent5].[Suburb] AS [Suburb1], [Extent5].[Country] AS [Country1]
FROM [dbo].[Person] AS [Extent1]
OUTER APPLY (
    SELECT TOP (1) [Extent2].[PersonID] AS [PersonID], [Extent2].[AddressID] AS [AddressID],
                   [Extent2].[Index] AS [Index]
    FROM [dbo].[PersonAddress] AS [Extent2]
    WHERE ([Extent1].[ID] = [Extent2].[PersonID]) AND (1 = [Extent2].[Index]) ) AS [Element1]
LEFT OUTER JOIN [dbo].[Address] AS [Extent3] ON [Element1].[AddressID] = [Extent3].[ID]
OUTER APPLY (
    SELECT TOP (1) [Extent4].[PersonID] AS [PersonID], [Extent4].[AddressID] AS [AddressID],
                   [Extent4].[Index] AS [Index]
    FROM [dbo].[PersonAddress] AS [Extent4]
    WHERE ([Extent1].[ID] = [Extent4].[PersonID]) AND (2 = [Extent4].[Index]) ) AS [Element2]
LEFT OUTER JOIN [dbo].[Address] AS [Extent5] ON [Element2].[AddressID] = [Extent5].[ID]
So, if we’re stuck using LINQ to SQL and can’t jump ship to the more mature Entity Framework, how can we manipulate the LINQ to force it to write better SQL? Let’s try putting the Index predicate (ie pa => pa.Index == 1) into the join instead:
from person in context.Persons
join pa in context.PersonAddresses on new { person.ID, Index = 1 } equals new { ID = pa.PersonID, pa.Index } into pa1s
join pa in context.PersonAddresses on new { person.ID, Index = 2 } equals new { ID = pa.PersonID, pa.Index } into pa2s
from pa1 in pa1s.DefaultIfEmpty()
from pa2 in pa2s.DefaultIfEmpty()
let firstAddress = pa1.Address
let secondAddress = pa2.Address
select new
{
    Name = person.Name,
    Street1 = firstAddress.Street,
    Suburb1 = firstAddress.Suburb,
    Country1 = firstAddress.Country,

    Street2 = secondAddress.Street,
    Suburb2 = secondAddress.Suburb,
    Country2 = secondAddress.Country,
}
This causes LINQ to SQL (and Entity Framework) to generate exactly the SQL we were originally aiming for! Notice the use of DefaultIfEmpty to turn the joins into left outer joins (remember that joins in LINQ are inner joins).
At this point you may be thinking “I’ll just use Entity Framework because it seems like I can trust it to write good SQL for me”. Hold your horses my friend; let’s modify the above query just slightly and get rid of those let statements, inlining the navigation through PeopleAddress’s Address property. That’s just navigating through a many to one relation, that shouldn’t cause any problems, right?
from person in context.Persons
join pa in context.PersonAddresses on new { person.ID, Index = 1 } equals new { ID = pa.PersonID, pa.Index } into pa1s
join pa in context.PersonAddresses on new { person.ID, Index = 2 } equals new { ID = pa.PersonID, pa.Index } into pa2s
from pa1 in pa1s.DefaultIfEmpty()
from pa2 in pa2s.DefaultIfEmpty()
select new
{
    Name = person.Name,
    Street1 = pa1.Address.Street,
    Suburb1 = pa1.Address.Suburb,
    Country1 = pa1.Address.Country,

    Street2 = pa2.Address.Street,
    Suburb2 = pa2.Address.Suburb,
    Country2 = pa2.Address.Country,
}
Wrong! Now Entity Framework is doing that retarded table join-per-column thing (the query cost is 0.0312):
SELECT [Extent1].[ID] AS [ID], [Extent1].[Name] AS [Name], [Extent4].[Street] AS [Street],
       [Extent5].[Suburb] AS [Suburb], [Extent6].[Country] AS [Country], [Extent7].[Street] AS [Street1],
       [Extent8].[Suburb] AS [Suburb1], [Extent9].[Country] AS [Country1]
FROM [dbo].[Person] AS [Extent1]
LEFT OUTER JOIN [dbo].[PersonAddress] AS [Extent2] ON ([Extent1].[ID] = [Extent2].[PersonID]) AND (1 = [Extent2].[Index])
LEFT OUTER JOIN [dbo].[PersonAddress] AS [Extent3] ON ([Extent1].[ID] = [Extent3].[PersonID]) AND (2 = [Extent3].[Index])
LEFT OUTER JOIN [dbo].[Address] AS [Extent4] ON [Extent2].[AddressID] = [Extent4].[ID]
LEFT OUTER JOIN [dbo].[Address] AS [Extent5] ON [Extent2].[AddressID] = [Extent5].[ID]
LEFT OUTER JOIN [dbo].[Address] AS [Extent6] ON [Extent2].[AddressID] = [Extent6].[ID]
LEFT OUTER JOIN [dbo].[Address] AS [Extent7] ON [Extent3].[AddressID] = [Extent7].[ID]
LEFT OUTER JOIN [dbo].[Address] AS [Extent8] ON [Extent3].[AddressID] = [Extent8].[ID]
LEFT OUTER JOIN [dbo].[Address] AS [Extent9] ON [Extent3].[AddressID] = [Extent9].[ID]
Incidentally, if you put that query through LINQ to SQL, you’ll find it can deal with the inlined navigation properties and it still generates the correct query (sigh!).
So what’s the lesson here? The lesson is that you must always keep a very close eye on what SQL your LINQ providers are writing for you. A tool like LINQPad may be of some use, as you can write your queries in it and it’ll show you the generated SQL. Although Entity Framework does a better job with SQL generation than LINQ to SQL, as evidenced by it being able to handle our first, more intuitive, LINQ query, it’s still fairly easy to trip it up and get it to write badly performing SQL, so you still must keep your eye on it.
Sweeping Yucky LINQ Queries Under the Rug with Expression Tree Rewriting
May 02, 2011 2:06 PM by Daniel Chambers (last modified on May 03, 2011 6:43 AM)
In my last post, I explained some workarounds that you could hack into your LINQ queries to get them to perform well when using LINQ to SQL and SQL CE 3.5. Although those workarounds do help fix performance issues, they can make your LINQ query code very verbose and noisy. In places where you’d simply call a constructor and pass an entity object in, you now have to use an object initialiser and copy the properties manually. What if there are 10 properties (or more!) on that class? You get a lot of inline code. What if you use it across 10 queries and you later want to add a property to that class? You have to find and change it in 10 places. Did somebody mention code smell?
In order to work around this issue, I’ve whipped up a small amount of code that allows you to centralise these repeated chunks of query code, but unlike the normal (and still recommended, if you don’t have these performance issues) technique of putting the code in a method/constructor, this doesn’t trigger these performance issues. How? Instead of the query calling into an external method to execute your query snippet, my code takes your query snippet and inlines it directly into the LINQ query’s expression tree. (If you’re rusty on expression trees, try reading this post, which deals with some basic expression trees stuff.) I’ve called this code the ExpressionTreeRewriter.
The Rewriter in Action
Let’s set up a little (and very contrived) scenario and then clean up the mess using the rewriter. Imagine we had this entity and this DTO:
public class PersonEntity
{
    public int ID { get; set; }
    public string FirstName { get; set; }
    public string LastName { get; set; }
}

public class PersonDto
{
    public int EntityID { get; set; }
    public string GivenName { get; set; }
    public string Surname { get; set; }
}
Then imagine this nasty query (if it’s not nasty enough for you, add 10 more properties to PersonEntity and PersonDto in your head):
IQueryable<PersonDto> people = from person in context.People
                               select new PersonDto
                               {
                                   EntityID = person.ID,
                                   GivenName = person.FirstName,
                                   Surname = person.LastName,
                               };
Normally, you’d just put those property assignments in a PersonDto constructor that takes a PersonEntity and then call that constructor in the query. Unfortunately, we can’t do that for performance reasons. So how can we centralise those property assignments, but keep our object initialiser? I’m glad you asked!
First, let’s add some stuff to PersonDto:
public class PersonDto
{
    ...

    public static Expression<Func<PersonEntity,PersonDto>> ToPersonDtoExpression
    {
        get
        {
            return person => new PersonDto
            {
                EntityID = person.ID,
                GivenName = person.FirstName,
                Surname = person.LastName,
            };
        }
    }


    [RewriteUsingLambdaProperty(typeof(PersonDto), "ToPersonDtoExpression")]
    public static PersonDto ToPersonDto(PersonEntity person)
    {
        throw new InvalidOperationException("This method is a marker method and must be rewritten out.");
    }
}
Now let’s rewrite the query:
IQueryable<PersonDto> people = (from person in context.People
                                select PersonDto.ToPersonDto(person)).Rewrite();
Okay, admittedly it’s still not as nice as just calling a constructor, but unfortunately our hands are tied in that respect. However, you’ll notice that we’ve centralised that object initialiser snippet into the ToPersonDtoExpression property and somehow we’re using that by calling ToPersonDto in our query.
So how does this all work? The PersonDto.ToPersonDto static method is what I’ve dubbed a “marker method”. As you can see, it does nothing at all, simply throwing an exception to help with debugging. The call to this method is incorporated into the expression tree constructed for the query (stored in IQueryable<T>.Expression). This is what that expression tree looks like:

The expression tree before being rewritten
When you call the Rewrite extension method on your IQueryable, it recurs through this expression tree looking for MethodCallExpressions that represent calls to marker methods that it can rewrite. Notice that the ToPersonDto method has the RewriteUsingLambdaPropertyAttribute applied to it? This tells the rewriter that it should replace that method call with an inlined copy of the LambdaExpression returned by the specified static property. Once this is done, the expression tree looks like this:
")
The expression tree after being rewritten (click to enlarge)
Notice that the LambdaExpression’s Body (which used to be the MethodCallExpression of the marker method) has been replaced with the expression tree for the object initialiser.
Something to note: the method signature of marker method and that of the delegate type passed to Expression<T> on your static property must be identical. So if your marker method takes two ClassAs and returns a ClassB, your static property must be of type Expression<Func<ClassA,ClassA,ClassB>> (or some delegate equivalent to the Func<T1,T2,TResult> delegate). If they don’t match, you will get an exception at runtime.
Rewriter Design

Expression Tree Rewriter Design Diagram
The ExpressionTreeRewriter is the class that implements the .Rewrite() extension method. It searches through the expression tree for called methods that have a RewriterMarkerMethodAttribute on them. RewriterMarkerMethodAttribute is an abstract class, one implementation of which you have already seen. The ExpressionTreeRewriter uses the attribute to create an object implementing IExpressionRewriter which it uses to rewrite the MethodCallExpression it found.
The RewriteUsingLambdaPropertyAttribute creates a LambdaInlinerRewriter properly configured to inline the LambdaExpression returned from your static property. The LambdaInlinerRewriter is called by the ExpressionTreeRewriter to rewrite the marker MethodCallExpression and replace it with the body of the LambdaExpression returned by your static property.
The other marker attribute, RewriteUsingRewriterClassAttribute, allows you to specify a class that implements IExpressionRewriter which will be returned to the rewriter when it wants to rewrite that marker method. Using this attribute gives you low level control over the rewriting as you can create classes that write expression trees by hand.
The EntityNullTestRewriter is one such class. It takes a query with the nasty nullable int performance hack:
IQueryable<IntEntity> queryable = entities.AsQueryable()
    .Where(e => (int?)e.ID != null)
    .Rewrite();
and allows you to sweep that hacky code under the rug, so to speak:
IQueryable<IntEntity> queryable = entities.AsQueryable()
    .Where(e => RewriterMarkers.EntityNullTest(e.ID))
    .Rewrite();
RewriterMarkers.EntityNullTest looks like this:
[RewriteUsingRewriterClass(typeof(EntityNullTestRewriter))]
public static bool EntityNullTest<T>(T entityPrimaryKey)
{
    throw new InvalidOperationException("Should not be executed. Should be rewritten out of the expression tree.");
}
The advantage of EntityNullTest is that people can look at its documentation to see why it’s being used. A person new to the project, or who doesn’t know about the performance hacks, may refactor the int? cast away as it looks like pointless bad code. Using something like EntityNullTest prevents this from happening and also raises awareness of the performance issues.
Give Me The Code!
Enough chatter, you want the code don’t you? The ExpressionTreeRewriter is a part of the DigitallyCreated Utilities BCL library. However, at the time of writing (changeset 4d1274462543), the current release of DigitallyCreated Utilities doesn’t include it, so you’ll need to check out the code from the repository and compile it yourself (easy). The ExpressionTreeRewriter only supports .NET 4, as it uses the ExpressionVisitor class only available in .NET 4; so don’t accidentally use a revision from the .NET 3.5 branch and wonder why the rewriter is not there.
I will get around to making a proper official release of DigitallyCreated Utilities at some point; I’m slowly but surely writing the doco for all the new stuff that I’ve added, and also writing a proper build script that will automate the releases for me and hopefully create NuGet packages too.
Conclusion
The ExpressionTreeRewriter is not something you should just use willy-nilly. If you can get by without it by using constructors and method calls in your LINQ, please do so; your code will be much neater and more understandable. However, if you find yourself in a place like those of us fighting with LINQ to SQL and SQL CE 3.5 performance, a place where you really need to inline lambdas and rewrite your expression trees, please be my guest, download the code, and enjoy.
Working Around Performance Issues in LINQ to SQL and SQL CE 3.5
April 25, 2011 5:17 PM by Daniel Chambers (last modified on May 02, 2011 2:26 PM)
Recently I’ve been optimising LINQ to SQL queries running against an SQL CE 3.5 database in order to stop them taking over 5 minutes to execute and bringing them down to only a few seconds. In this post I’m going to go into two of the biggest offenders I’ve seen so far in terms of killing query performance. Credit must go to my fellow Readifarian Colin Savage with whom I worked to discover and find solutions for the offending LINQ query expressions.
In this post, I’m going to be using the following demonstration LINQ to SQL classes. Note that these are just demo classes and aren’t recommended practice or even fully fleshed out. Note that Game.DeveloperID has an index against it in the database.
[Table(Name = "Developer")]
public class Developer
{
    [Column(DbType = "int NOT NULL IDENTITY", IsPrimaryKey=true, IsDbGenerated=true)]
    public int ID { get; set; }

    [Column(DbType = "nvarchar(50) NOT NULL")]
    public string Name { get; set; }
}

[Table(Name = "Game")]
public class Game
{
    [Column(DbType = "int NOT NULL IDENTITY", IsPrimaryKey=true, IsDbGenerated=true)]
    public int ID { get; set; }

    [Column(DbType = "nvarchar(50) NOT NULL")]
    public string Name { get; set; }

    [Column(DbType = "int NOT NULL")]
    public int DeveloperID { get; set; }

    [Column(DbType = "int NOT NULL")]
    public int Ordinal { get; set; }
}
Outer Joining and Null Testing Entities
The first performance killer Colin and I ran into is where you’re testing whether an outer joined entity is null. Here’s a query that includes the performance killer expression:
var query = from d in context.GetTable<Developer>()
            join g in context.GetTable<Game>()
                on d.ID equals g.DeveloperID into tempG
            from g in tempG.DefaultIfEmpty()
            select new
            {
                d,

                //Inefficient
                Name = g != null ? g.Name : String.Empty,
            };
The above query is doing a left outer join of Game against Developer, and in the case that the developer doesn’t have any games, it’s setting the Name property of the anonymous projection object to String.Empty. Seems like a pretty reasonable query, right?
Wrong. In SQL CE, this is the SQL generated and the query plan created:
SELECT [t0].[ID], [t0].[Name],
(CASE
    WHEN [t2].[test] IS NOT NULL THEN [t2].[Name]
    ELSE CONVERT(NVarChar(50),'')
 END) AS [Name2]
FROM [Developer] AS [t0]
LEFT OUTER JOIN (
    SELECT 1 AS [test], [t1].[Name], [t1].[DeveloperID]
    FROM [Game] AS [t1]
) AS [t2] ON [t0].[ID] = [t2].[DeveloperID]

Inefficient join between two table scans on SQL CE 3.5
The problem is that the “SELECT 1 AS [test]” subquery in the SQL is causing SQL CE to do a join between two table scans, which on tables with lots of data is very very slow. Thankfully for those using real SQL Server (I tested on 2008 R2), it seems to be able to deal with this query form and generates an efficient query plan, as shown below.

Efficient join between two clustered index scans on SQL Server 2008 R2
So, what can we do to eliminate that subquery from the SQL? Well, we’re causing that subquery by performing a null test against the entity object in the LINQ expression (LINQ to SQL looks at the [test] column to see if there is a joined entity there; if it’s 1, there is, if it’s NULL, there isn’t). So how about this query instead?
var query = from d in context.GetTable<Developer>()
            join g in context.GetTable<Game>()
               on d.ID equals g.DeveloperID into tempG
            from g in tempG.DefaultIfEmpty()
            select new
            {
                d,

                //Efficient
                Name = g.ID != 0 ? g.Name : String.Empty,
            };
Success! This generates the following SQL and query plan against SQL CE 3.5:
SELECT [t0].[ID], [t0].[Name],
    (CASE
        WHEN [t1].[ID] <> 0 THEN CONVERT(NVarChar(50),[t1].[Name])
        ELSE NULL
     END) AS [Name2]
FROM [Developer] AS [t0]
LEFT OUTER JOIN [Game] AS [t1] ON [t0].[ID] = [t1].[DeveloperID]

Efficient join between a table scan and an index seek on SQL CE 3.5
The subquery has been removed from the SQL and the query plan reflects this; it now uses an index seek instead of a second table scan in order to do the join. This is much faster!
Okay, that seems like a simple fix. So when we use it like below, putting g.Name into another object, it should keep working correctly, right?
var query = from d in context.GetTable<Developer>()
            join g in context.GetTable<Game>()
                on d.ID equals g.DeveloperID into tempG
            from g in tempG.DefaultIfEmpty()
            select new
            {
                d,

                //Broken
                Name = g.ID != 0 ? new Wrap { Str = g.Name } : null
            };
Unfortunately, no. You may get an InvalidOperationException at runtime (depending on the data in your DB) with the confusing message “The null value cannot be assigned to a member with type System.Boolean which is a non-nullable value type.”
If we look at the SQL generated by this LINQ query and the data returned from the DB, we can see what’s causing this problem:
SELECT [t0].[ID], [t0].[Name],
    (CASE
        WHEN [t1].[ID] <> 0 THEN 1
        WHEN NOT ([t1].[ID] <> 0) THEN 0
        ELSE NULL
     END) AS [value], [t1].[Name] AS [Str]
FROM [Developer] AS [t0]
LEFT OUTER JOIN [Game] AS [t1] ON [t0].[ID] = [t1].[DeveloperID]

The data returned by the broken query
It’s probably a fair to make the assumption that LINQ to SQL is using the [value] column internally to evaluate the “g.ID != 0” part of the LINQ query, but you’ll notice that in the data the value is NULL for one of the rows. This seems to be what is causing the “can’t assign a null to a bool” error we’re getting. I think this is a bug in LINQ to SQL, because as far as I can tell as this is pretty unintuitive behaviour. Note that this SQL query form, that causes this problem with its CASE, WHEN, WHEN, ELSE expression, is only generated when we project the results into another object, not when we just project the results straight into the main projection object. I don’t know why this is.
So how can we work around this? Prepare to vomit just a little bit, up in the back of your mouth:
var query = from d in context.GetTable<Developer>()
            join g in context.GetTable<Game>()
                on d.ID equals g.DeveloperID into tempG
            from g in tempG.DefaultIfEmpty()
            select new
            {
                d,

                //Fixed! (WTF??)
                Name = (int?)g.ID != null ? new Wrap { Str = g.Name } : null
            };
Mmm, tasty! :S Yes, that C# doesn’t even make sense and a good tool like ReSharper would tell you to remove that pointless int? cast, because ID is already an int and casting it to an int? and checking for null is entirely pointless. But this query form forces LINQ to SQL to generate the SQL we want:
SELECT [t0].[ID], [t0].[Name],
    (CASE
        WHEN ([t1].[ID]) IS NOT NULL THEN 1
        ELSE 0
     END) AS [value], [t1].[Name] AS [Str]
FROM [Developer] AS [t0]
LEFT OUTER JOIN [Game] AS [t1] ON [t0].[ID] = [t1].[DeveloperID]

The data returned by the fixed query
Note that the query now returns the expected 0 value instead of NULL in the last row.
Outer Joining and Projecting into an Object Constructor
The other large performance killer Colin and I ran into is where you project into an object constructor. Here’s an example:
var query = from d in context.GetTable<Developer>()
            join g in context.GetTable<Game>()
               on d.ID equals g.DeveloperID into tempG
            from g in tempG.DefaultIfEmpty()
            select new
            {
                d,

                //Inefficient
                Name = (int?)g.ID != null ? new Wrap(g) : null
            };
In the above query we’re passing the whole Game object into Wrap’s constructor, where it’ll copy the Game’s properties to its properties. This makes for neater queries, instead of having a massive object initialiser block where you set all the properties on Wrap with properties from Game. Too bad it reintroduces our little subquery issue back into the SQL:
SELECT [t0].[ID], [t0].[Name],
    (CASE
        WHEN ([t2].[ID]) IS NOT NULL THEN 1
        ELSE 0
     END) AS [value], [t2].[test], [t2].[ID] AS [ID2], [t2].[Name] AS [Name2], [t2].[DeveloperID], [t2].[Ordinal]
FROM [Developer] AS [t0]
LEFT OUTER JOIN (
    SELECT 1 AS [test], [t1].[ID], [t1].[Name], [t1].[DeveloperID], [t1].[Ordinal]
    FROM [Game] AS [t1]
    ) AS [t2] ON [t0].[ID] = [t2].[DeveloperID]
Unfortunately, the only way to get rid of the subquery again is to ditch the constructor and manually initialise the object with an object initialiser, making your queries much longer and noisy when there are a lot of properties:
var query = from d in context.GetTable<Developer>()
            join g in context.GetTable<Game>()
                on d.ID equals g.DeveloperID into tempG
            from g in tempG.DefaultIfEmpty()
            select new
            {
                d,

                //Efficient
                Name = (int?)g.ID != null ? new Wrap { Str = g.Name } : null
            };
This gives us back our efficient (on SQL CE 3.5) SQL:
SELECT [t0].[ID], [t0].[Name],
    (CASE
        WHEN ([t1].[ID]) IS NOT NULL THEN 1
        ELSE 0
     END) AS [value], [t1].[Name] AS [Str]
FROM [Developer] AS [t0]
LEFT OUTER JOIN [Game] AS [t1] ON [t0].[ID] = [t1].[DeveloperID]
Conclusion
For those using LINQ to SQL against real SQL Server, these LINQ contortions are unnecessary to get your performance as real SQL Server is able to make efficient query plans for the form of query that LINQ to SQL creates. However, SQL CE 3.5 can’t deal with these queries and so you need to munge your LINQ queries a bit to get them to perform, which is frustrating. Heading into the future, this won’t be a problem (hopefully) because SQL CE 4 doesn’t support LINQ to SQL and hopefully Entity Framework 4 doesn’t write queries like this (or maybe SQL CE 4 can just deal with it properly). For those on that software stack, it’s probably worth checking out what EF and SQL CE 4 is doing under the covers, as these problems highlight the need for software developers to watch what their LINQ providers are writing for them under the covers to make sure it’s performant.
Edit: For a way to help clean up the verbose hacked up LINQ queries that you end up with when working around these performance problems, check out this post.
Windows Phone 7 Performance Tips and Resources
April 10, 2011 9:57 AM by Daniel Chambers
Following in the same vein as my previous post, this post will detail a number of tips and resources I’ve found for developing on Windows Phone 7, specifically covering optimising application performance. Unfortunately, the phone is not your eight core beast with 16GB of RAM and a graphics card that chews 300W of power when under load, so you need to keep testing your performance constantly and making changes to the way you’re doing things.
Test on Phone Hardware Regularly
The WP7 emulator is pretty good, and you’ll probably find yourself using it all the time to test your application as you write it. However, with regards to performance, how your application runs in the emulator is not representative of how your application will run on an actual phone device. You need to be testing constantly on the phone hardware to make sure your app is running smoothly.
Understand the Frame Rate Counters
The default WP7 project templates have a line in their App.xaml.cs files which turns on the frame rate counters when your app is attached to the debugger. Jeff Wilcox has a great article explaining what these tiny numbers actually mean. Don’t forget that even though the numbers may be high on the emulator, they may not be so good on an actual phone.
Add a Memory Counter Alongside the Frame Rate Counters
Unfortunately, those frame rate counters do not show a number for the total app memory consumed. Memory usage is important to know because WP7 has a 90MB upper limit for apps running on devices with 256MB of RAM. However, Peter Torr has written some code you can use that adds a memory counter next to the frame rate counters.
Understand What is Rendered by the GPU and What is Not
On WP7 there are two threads that handle the UI: the UI thread and the compositor thread. Operations performed on the UI thread are processed by the CPU, and when things are handled by the compositor thread they are done by the GPU. It goes without saying that you want to offload as much as possible onto the GPU, rather than the CPU. However, what gets handled by the compositor thread and what gets handled by the UI thread comes down to exactly what sort of operations you are performing; you don’t have direct control of what executes where. This article on the Telerik Blog explains this concept in more detail.
Use the PerformanceProgressBar
At some point, you’re going to use an indeterminate progress bar in your app to indicate some sort of loading operation. When you do, you may notice your UI performance suffer. Unfortunately, this is because the indeterminate ProgressBar does its fancy animating dots on the UI thread, rather than on the compositor thread. Jeff Wilcox has a good post about this (scroll down to “The back story”). The solution? Use the PerformanceProgressBar in the Silverlight for Windows Phone Toolkit when using indeterminate progress bars, as it implements a workaround for the problem.
Load Images Asynchronously
If you’re loading images from the web to display in Image controls on your UI, you might be tempted to just bind the Image’s Source property in the XAML to a URL in your view model. Don’t do this! Unfortunately, a lot of the downloading and processing of the images is done on the UI thread, so if you have a few images, your performance will suffer. What you need to do is download the images in a background thread, and once they’re downloaded, display them.
Thankfully, David Anson has written a sweet attached property for Images that will do this for you. It’s ridiculously easy to use; you simply set the LowProfileImageLoader.UriSource attached property on the Image instead of the normal Source property. His code will automatically download the image in a background thread, and set the Image’s Source when its done. Go grab his code, or download it from Nuget.
Understand the Performance Issues Involved with a ListBox
The default ListBox on WP7 uses a VirtualizingStackPanel to lay out its items, and its control template includes a ScrollViewer to enable you to scroll up and down through its items. The VirtualizingStackPanel works together with the list box’s ScrollViewer and unloads items that are outside the current view, in order to reduce memory usage. This sounds like a great idea (especially when doing infinite scrolling lists), except on the phone it doesn’t currently perform very well. If you have a long list and scroll through it rapidly, the list will jerk around and you will be able to see the VirtualizingStackPanel loading items as it tries to keep up with your scrolling and fails to do so in time. Unfortunately, due to the limited resources available on phone devices, I haven’t found a clear works-for-everything solution to this problem. However, there are a few solutions that may or may not work for you.
The first potential solution is David Anson’s, from the same PhonePerformance project mentioned in the last tip. He chooses to do away with the VirtualizingStackPanel altogether and use a normal StackPanel. He then supplements it by only loading items further down the list as you scroll down to them; however, once the items are loaded, they loaded and aren’t later removed (like the VirtualizingStackPanel would do). This ensures the scrolling performance is buttery smooth. However when testing this, I found that you need to keep a very close eye on your memory usage, especially when your list items include images. This means this technique is fine if you haven’t got a long/infinite list. If you do, however, you may want to investigate combining this technique with a form of paging. For example, you may do infinite scrolling for (say) five pages of data, then if the user wants to see 6-10, you provide a “next page” button that clears the list and loads page 6, within infinite scrolling loading for pages 7-10.
The second potential solution is Peter Torr’s LazyListBox. Unfortunately, I didn’t get a chance to try this out when struggling with the ListBox performance issues on my recent project, so I can’t comment much on it. I do like its idea of having two ItemTemplates, one for items currently on screen and one for items off screen. This could mean you could remove those Image controls from the off screen items to save yourself memory and CPU usage.
Another cool way of improving performance with ListBoxes (as mentioned on this blog post) is, when adding new items to the list box, add them in small batches rather than all in one go. This allows the UI thread to take a breather and respond to user input faster.
Conclusion
WP7 is a cool platform, but you must never forget that you’re programming for a device that would explode if it even thought of playing Crysis 2. You need to be constantly testing your performance on an actual phone device to ensure your app is staying performant. Hopefully this post has given you a few pointers to some low-hanging performance fruit you can pick.
Windows Phone 7 Developer Tips and Resources
April 08, 2011 7:50 AM by Daniel Chambers
I’ve just recently finished up a Windows Phone 7 (WP7) development project at work, and during the project I collated a number of tips and useful resources that helped make the project a success, and I’m going to share those with you in this post.
Understand the Marketplace Submission Process
If you want to check out exactly what the marketplace submission process entails, the App Hub website has a very detailed walkthrough of the process. Thankfully, it’s not difficult; you just need to provide your XAP, some descriptions, some artwork and set your pricing.
One of the big questions you get asked as a Windows Phone developer is how long it will take for your application to be published on the Marketplace after it’s been submitted. Microsoft recently released some official numbers around that, and they claim that the average time to certification is 1.8 days. Of course, that’s an average, so you shouldn’t rely on that for your planning. Microsoft could take longer if they’re inundated with submissions. That same numbers blog post also says that 62% of applications pass on the first attempt. That means around 40% of apps fail, so you should allocate some time in your schedule to handle a potential submission failure.
Use an MVVM Framework
I chose to use Caliburn Micro as my MVVM Framework. I found that Caliburn Micro helped me because it provided:
- Coroutines support
The coroutines support is awesome and allowed me to write asynchronous code in a non-asynchronous fashion while still actually doing operations asynchronously. If you’ve read about C# 5’s await support, this is sort of like that except implemented using iterator blocks. - Comprehensive MVVM support
One thing I’ve realised about MVVM is that it doesn’t describe a solution to the entire problem, which also includes navigation between, and composition of, views. Caliburn Micro has a concept called Conductors that helps with this, and it also abstracts the WP7 navigation functionality away from you. - Tombstoning support
Tombstoning in WP7 can be a pain, but Caliburn Micro makes it relatively easy. You simply apply attributes to properties in your view model that you want saved when your app gets tombstoned, and Caliburn Micro will automatically restore those properties’ values when your application is restored. It also helps you when you’re using WP7 Tasks that cause your app to get tombstoned before they return you some data the user selected. - Conventions-based data binding
I have a love-hate relationship with Caliburn Micro’s conventions-based data binding. It allows you to omit explicitly defined bindings in your view and Caliburn Micro will do it automatically for you based of its extensible conventions. On the one hand, it makes data binding easy; in particular commanding with ICommand, as it can just link an event in your view and a method on your view model automatically (and run that method as a coroutine, if you like). On the other hand, when something goes wrong, it’s much more difficult to find out why the black magic isn’t working.
The biggest disadvantage to Caliburn Micro is that it adds quite a lot of advanced techniques to your toolbox, which is great if you’re experienced, but can make it harder for people new to your project and unfamiliar with Caliburn Micro to get started. The other disadvantage is that the documentation (at the time of writing) is okay, but in a lot of cases I found I needed to dig through Caliburn Micro’s source code myself to see what was going on. (Tip: create and use a debug build of Caliburn Micro when debugging it, since the Release builds optimise out a lot of methods and make stepping through its code difficult. But don’t forget to switch back to the Release build when you publish to Marketplace).
Use the Silverlight for Windows Phone Toolkit
The default WP7 SDK is strangely missing some of the controls you expect to see there to make a good WP7 application look and feel like the native apps that come on the phone. Turns out that stuff is, for some reason, inside the Silverlight for Windows Phone Toolkit. The toolkit gets you those basic, expected things like the animated transitions between pages, the subtle tilting effect on buttons when you touch them, context menus, date pickers, list pickers, an easier API for gestures, etc.
The best way to learn how to use the stuff in the toolkit is to download the Source & Sample package and take a careful look at the sample code.
Use the Platform’s Theme Resources
WP7 comes with a lot of theming resources that you can reference using the StaticResource markup extension. Keep this MSDN page open in your browser while developing and use it as a reference. I highly recommend you use them everywhere you can, because they help keep your application’s look and feel consistent to the WP7 standards, and also come with the side effect of making your application automatically compatible with the user’s chosen background style (light/dark) and accent colour. So when the user selects black text on a white background, your text will automatically apply that styling. Neat!
While testing your application, I would encourage you to regularly switch between the different background styles and accent colours to make sure your application looks good no matter what theme the user chooses.
Take Advantage of the SDK’s Icon Library
The SDK comes with a library of icons you can use in your application, saved in C:\Program Files (x86)\Microsoft SDKs\Windows Phone\v7.0\Icons. Take advantage of them to ensure your icons are consistent with the WP7 look & feel and are familiar to your users.
Watch out for the Inbuilt HTTP Request Caching
As far as I can tell, WP7 seems to automatically and transparently cache HTTP requests for you based off their caching HTTP headers. This doesn’t seem to be documented on the HttpWebRequest class page, but at least one other person has noticed this behaviour. So if you’re calling a REST service and that REST service is setting cache headers saying cache the result for a day, your users won’t see new data for a day. Keep this in mind and perhaps change your service’s caching headers.
Borrow Code from the Expression Blend Samples to Enable VisualState binding to ViewModels
In Silverlight 4, you might change your visual state based off a property in your view model by using the DataTrigger in XAML. However, since WP7 is a sort of Silverlight 3 with extra bits, it doesn’t have DataTriggers. I chose to borrow some classes from the Expression Blend Samples code (licenced under Ms-PL), in particular the DataStateSwitchBehavior. It’s very elegant and lets me write XAML like this:
<i:Interaction.Behaviors>
    <local:DataStateSwitchBehavior Binding="{Binding IsLoading}">
        <local:DataStateSwitchCase Value="True" State="IsLoading" />
        <local:DataStateSwitchCase Value="False" State="HasLoaded" />
    </local:DataStateSwitchBehavior>
    <local:DataStateSwitchBehavior Binding="{Binding HasFailed}">
        <local:DataStateSwitchCase Value="False" State="HasNotFailed" />
        <local:DataStateSwitchCase Value="True" State="HasFailed" />
    </local:DataStateSwitchBehavior>
</i:Interaction.Behaviors>
To use the DataStateSwitchBehavior, you will also need to take the BindingListener class, the ConverterHelper class, and the GoToState class. In the example above I’m binding to a bool, but it even works if you bind to an enum.
Recognise and Handle the AG_E_NETWORK_ERROR from a MediaElement Control
While testing your application on a hardware device, you’ll likely be testing it while connected to the PC and the Zune software. However, for some reason the MediaElement control will fail with the AG_E_NETWORK_ERROR when you try to use it. Don’t panic, simply disconnect your phone from the Zune software and try again, or try connecting your phone using the WPConnect tool (C:\Program Files (x86)\Microsoft SDKs\Windows Phone\v7.0\Tools\WPConnect\WPConnect.exe) instead of Zune. Be kind to your users and show them a nice error message telling them to try disconnecting their phones from Zune if you detect that error.
Work Around Issues with the Pivot Control
There are reports on the Internet that the Pivot control has crashing issues when setting its SelectedIndex. Caliburn Micro has a PivotFix class in its WP7 samples you can use to work around it, plus you might like to try the workarounds on this page. However, if you still can’t get it to work (like I couldn’t), try simply slicing and reordering the array of pivot items so the one you want selected is first, which avoids this issue. For example, if you want pivot item C to be first, reorder A,B,C,D,E into C,D,E,A,B. Your users won’t notice the difference since the Pivot control automatically wraps the end of the list to the start and vice versa.
I found it very difficult to tell that it was the Pivot control causing the crashes; my application would trigger a break by the debugger in the App.xaml.cs’s unhandled exception handler method and the exception’s description would be “The parameter is incorrect” and there would be no stack trace (??!). If you see this exception, investigate how you’re using your Pivot control.
Support Infinite Scrolling
Everyone loves infinite scrolling of lists, where more content in the list is loaded dynamically as you scroll down. Unfortunately, WP7’s SDK doesn’t give you any help out of the box in regards to doing this. Thankfully, Daniel Vaughan has developed a neat attached property you can attach to list boxes that will call a data bound ICommand when the user scrolls to the bottom of the list. You can use this to load more data into the ListBox.
Daniel’s ScrollViewerMonitor class uses a BindingListener class, which isn’t the same class as the one you’ve borrowed from Expression Blend Samples, but you can easily modify his code to use that class instead.
Be aware that infinite scrolling will likely require careful monitoring of your memory usage (WP7’s max is currently 90MB for phones with 256MB of RAM); you will probably need to put an upper limit on how far you can scroll. It will probably also mean you’ll be using a VirtualizedStackPanel inside of your ListBox (that’s the default) to keep memory usage down, but keep in mind the performance for scrolling rapidly up and down in a VirtualizedStackPanel-powered ListBox is poor on WP7 at the moment.
Learn How to Hide the System Tray using Visual States
A typical case where you’d want to hide the system tray using visual states is when you’ve got a visual state group for device orientation (ie Portrait and Landscape. Use a DataStateSwitchBehavior and bind it to the Page’s Orientation property). Visual states use animations to change properties on objects, but unfortunately animations in XAML don’t work with “custom” attached properties, such as shell:SystemTray.IsVisible.
To get around that, you’ll have to add that animation to the visual state’s storyboard in code. Here’s some code that goes in your page class’s constructor, underneath the call to InitializeComponent, that hides the system tray when the device is turned horizontally:
ObjectAnimationUsingKeyFrames animation = new ObjectAnimationUsingKeyFrames();
Storyboard.SetTargetProperty(animation, new PropertyPath(SystemTray.IsVisibleProperty));
Storyboard.SetTargetName(animation, "Page");

DiscreteObjectKeyFrame keyFrame = new DiscreteObjectKeyFrame();
keyFrame.Value = false;
keyFrame.KeyTime = KeyTime.FromTimeSpan(TimeSpan.Zero);

animation.KeyFrames.Add(keyFrame);
Landscape.Storyboard.Children.Add(animation); //Landscape is my visual state
I highly recommend hiding the system tray when in landscape orientation, because it takes up a ridiculous amount of room on the side of the screen and looks horrible.
Learn How to Involve the Application Bar in Visual States
Incredibly annoyingly, nothing on a page’s application bar is data-bindable, which instantly makes it very hard to use in an MVVM way, not to mention making it so you can’t do things like hide it or disable certain buttons using visual states in Blend. However, there is a workaround that can enable you to change the application bar’s properties using visual states if you’re willing to write some C#. In your page’s constructor, underneath the call to InitializeComponent, you can set up hooks off your visual states’ animation storyboard’s Completed events and make your changes there. For example:
IsLoading.Storyboard.Completed += (o, a) => Page.ApplicationBar.IsVisible = false;
HasLoaded.Storyboard.Completed += (o, a) => Page.ApplicationBar.IsVisible = true;
Conclusion
WP7 is a great platform to develop on because it’s Silverlight; it means if you’ve got some Silverlight (or WPF) experience you can be instantly productive. However, there are some limitations to the platform at the moment and for some things you need to go outside the box to be able to achieve them. Hopefully this post has made some of that easier for you.
More Dynamic Queries using Expression Trees
February 09, 2011 2:42 PM by Daniel Chambers
In my first post on dynamic queries using expression trees, I explained how one could construct an expression tree manually that would take an array (for example, {10,12,14}) and turn it into a query like this:
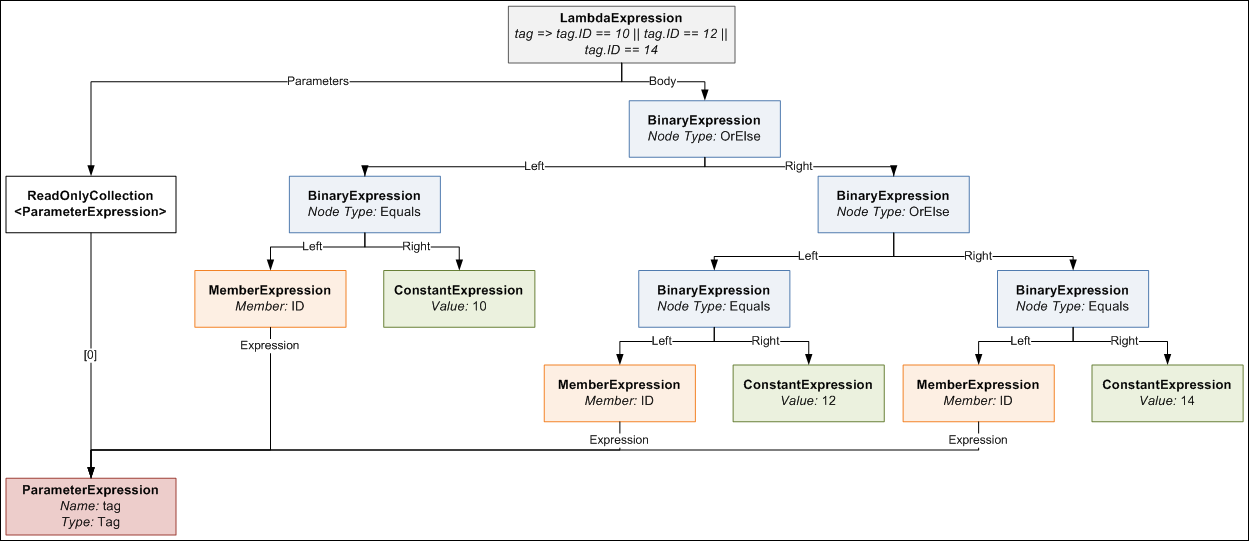
tag => tag.ID == 10 || tag.ID == 12 || tag.ID == 14
A reader recently wrote to me and asked whether one could form a similar query that instead queried across multiple properties, like this:
tag => tag.ID == 10 || tag.ID == 12 || tag.Name == "C#" || tag.Name == "Expression Trees"
The short answer is “yes, you can”, however the long answer is “yes, but it takes a bit of doing”! In this blog post, I’ll detail how to write a utility method that allows you to create these sorts of queries for any number of properties on an object. (If you haven’t read the previous post, please read it now.)
Previously we had defined a method with this signature (I’ve renamed the “convertBetweenTypes” parameter to “memberAccessExpression”; the original name sucked, frankly; this is a clearer name):
public static Expression<Func<TValue, bool>> BuildOrExpressionTree<TValue, TCompareAgainst>(
    IEnumerable<TCompareAgainst> wantedItems,
    Expression<Func<TValue, TCompareAgainst>> memberAccessExpression)
Now that we want to query multiple properties, we’ll need to change this signature to something that allows you to pass multiple wantedItems lists and a memberAccessExpression for each of them.
public static Expression<Func<TValue, bool>> BuildOrExpressionTree<TValue>(
    IEnumerable<Tuple<IEnumerable<object>, LambdaExpression>> wantedItemCollectionsAndMemberAccessExpressions)
Eeek! That’s a pretty massive new single parameter. What we’re now doing is passing in multiple Tuples (if you’re using .NET 3.5, make your own Tuple class), where the first component is the list of wanted items, and the second component is the member access expression. You’ll notice that a lot of the generic types have gone out the window and we’re passing IEnumerables of object and LambdaExpressions around; this is a price we’ll have to pay for having a more flexible method.
How would you call this monster method? Like this:
var wantedItemsAndMemberExprs = new List<Tuple<IEnumerable<object>, LambdaExpression>>
{
    new Tuple<IEnumerable<object>, LambdaExpression>(new object[] {10, 12}, (Expression<Func<Tag, int>>)(t => t.ID)),
    new Tuple<IEnumerable<object>, LambdaExpression>(new[] {"C#", "Expression Trees"}, (Expression<Func<Tag, string>>)(t => t.Name)),
};

Expression<Func<Tag, bool>> whereExpr = BuildOrExpressionTree<Tag>(wantedItemsAndMemberExprs);
Note having to explicitly specify “object[]” for the array of IDs; this is because, although you can now assign IEnumerable<ChildClass> to IEnumerable<ParentClass> (covariance) in C# 4, that only works for reference types. Value types are invariant, so you need to explicitly force int to be boxed as a reference type. Note also having to explicitly cast the member access lambda expressions; this is because the C# compiler won’t generate an expression tree for you unless it knows you explicitly want an Expression<T>; casting forces it to understand that you want an expression tree here and not just some anonymous delegate.
So how is the new BuildOrExpressionTree method implemented? Like this:
public static Expression<Func<TValue, bool>> BuildOrExpressionTree<TValue>(
    IEnumerable<Tuple<IEnumerable<object>, LambdaExpression>> wantedItemCollectionsAndMemberAccessExpressions)
{
    ParameterExpression inputParam = null;
    Expression binaryExpressionTree = null;

    if (wantedItemCollectionsAndMemberAccessExpressions.Any() == false)
        throw new ArgumentException("wantedItemCollectionsAndMemberAccessExpressions may not be empty", "wantedItemCollectionsAndMemberAccessExpressions");

    foreach (Tuple<IEnumerable<object>, LambdaExpression> tuple in wantedItemCollectionsAndMemberAccessExpressions)
    {
        IEnumerable<object> wantedItems = tuple.Item1;
        LambdaExpression memberAccessExpr = tuple.Item2;

        if (inputParam == null)
            inputParam = memberAccessExpr.Parameters[0];
        else
            memberAccessExpr = new ParameterExpressionRewriter(memberAccessExpr.Parameters[0], inputParam).VisitAndConvert(memberAccessExpr, "BuildOrExpressionTree");

        BuildBinaryOrTree(wantedItems, memberAccessExpr.Body, ref binaryExpressionTree);
    }

    return Expression.Lambda<Func<TValue, bool>>(binaryExpressionTree, new[] { inputParam });
}
As I explain this method, you may want to keep an eye on the expression tree diagram from the previous post, so you can visualise the expression tree structure easily. The method loops through each tuple that contains a wantedItems collection and a memberAccessExpression, and progressively builds an expression tree from all the items in all the collections. You’ll notice within the foreach loop that the ParameterExpression from the first memberAccessExpression is kept and used to “rewrite” subsequent memberAccessExpressions. Each memberAccessExpr is a separate expression tree, each with its own ParameterExpression, but since we’re now using multiple of them and combining them all into a single expression tree that still takes a single parameter, we need to ensure that those expressions use a common ParameterExpression. We do this by implementing an ExpressionVisitor that rewrites the expression and replaces the ParameterExpression it uses with the one we want it to use.
public class ParameterExpressionRewriter : ExpressionVisitor
{
    private ParameterExpression _OldExpr;
    private ParameterExpression _NewExpr;

    public ParameterExpressionRewriter(ParameterExpression oldExpr, ParameterExpression newExpr)
    {
        _OldExpr = oldExpr;
        _NewExpr = newExpr;
    }

    protected override Expression VisitParameter(ParameterExpression node)
    {
        if (node == _OldExpr)
            return _NewExpr;
        else
            return base.VisitParameter(node);
    }
}
The ExpressionVisitor uses the visitor pattern, so it recurses through an expression tree and calls different methods on the class depending on what node type it encounters and allows you to rewrite the tree by returning something different from the method. In the VisitParameter method above, we’re simply returning the new ParameterExpression when we encounter the old ParameterExpression in the tree. Note that ExpressionVisitor is new to .NET 4, so if you’re stuck in 3.5-land use this similar implementation instead. (For more information on modifying expression trees, see this MSDN page.)
Going back to the BuildOrExpressionTree method, we see the next thing we do is call the BuildBinaryOrTree method. Note that this method is slightly different to the implementation in the previous post, as I’ve changed it to be a faster iterative algorithm (rather than recursive) and it no longer is generic. The method should look pretty familiar:
private static void BuildBinaryOrTree(
    IEnumerable<object> items,
    Expression memberAccessExpr,
    ref Expression expression)
{
    foreach (object item in items)
    {
        ConstantExpression constant = Expression.Constant(item, item.GetType());
        BinaryExpression comparison = Expression.Equal(memberAccessExpr, constant);

        if (expression == null)
            expression = comparison;
        else
            expression = Expression.OrElse(expression, comparison);
    }
}
As you can see, for each iteration in the main BuildBinaryOrExpressionTree, the existing binary OR tree is fed back into the BuildBinaryOrTree method and extended with more nodes, except each different call uses items from a different collection and a different memberAccessExpression to extend the tree. Once all Tuples have been processed, the binary OR tree is bound together with its ParameterExpression and turned into the LambdaExpression we need for use in an IQueryable Where method. We can use it like this:
Expression<Func<Tag, bool>> whereExpr = BuildOrExpressionTree<Tag>(wantedItemsAndMemberExprs);

IQueryable<Tag> tagQuery = tags.Where(whereExpr);
In conclusion, we see that wanting to query those additional properties required us to add a whole bunch more code in order to make it work. However, in the end, it does work and works quite well, although admittedly the method is a little awkward to use. This could be cleaned up by wrapping it in a “builder”-style class that simplifies the API a little, but I’ll leave that as an exercise to the reader.
Combining multiple assemblies into a single EXE for a WPF application
December 23, 2010 4:22 PM by Daniel Chambers
Recently I’ve been writing a small WPF application for work where the goal is to be able to allow its users to download a single .exe file onto a server machine they are working on, use the executable, then delete it once they are done on that server. The servers in question have a strict software installation policy, so this application cannot have an installer and therefore must be as easy to ‘deploy’ as possible. Unfortunately, pretty much every .NET project is always going to reference some 3rd party assemblies that will be placed alongside the executable upon deploy. Microsoft has a tool called ILMerge that is capable of merging .NET assemblies together, except that it is unable to do so for WPF assemblies, since they contain XAML which contains baked in assembly references. While thinking about the issue, I supposed that I could’ve simply provided our users with a zip file that contained a folder with the WPF executable and its referenced assemblies inside it, and get them to extract that, go into the folder and find and run the executable, but that just felt dirty.
Searching around the internet found me a very useful post by an adventuring New Zealander, which introduced me to the idea of storing the referenced assemblies inside the WPF executable as embedded resources, and then using an assembly resolution hook to load the the assembly out of the resources and provide it to the CLR for use. Unfortunately, our swashbuckling New Zealander’s code didn’t work for my particular project, as it set up the assembly resolution hook after my application was trying to find its assemblies. He also didn’t mention a clean way of automatically including those referenced assemblies as resources, which I wanted as I didn’t want to be manually including my assemblies as resources in my project file. However, his blog post planted the seed of what is to come, so props to him for that.
I dug around in MSBuild and figured out a way of hooking off the normal build process and dynamically adding any project references that are going to be copied locally (ie copied into the bin directory, alongside the exe file) as resources to be embedded. This turned out to be quite simple (this code snippet should be added to your project file underneath where the standard Microsoft.CSharp.targets file is imported):
<Target Name="AfterResolveReferences">
  <ItemGroup>
    <EmbeddedResource Include="@(ReferenceCopyLocalPaths)" Condition="'%(ReferenceCopyLocalPaths.Extension)' == '.dll'">
      <LogicalName>%(ReferenceCopyLocalPaths.DestinationSubDirectory)%(ReferenceCopyLocalPaths.Filename)%(ReferenceCopyLocalPaths.Extension)</LogicalName>
    </EmbeddedResource>
  </ItemGroup>
</Target>

Figure 1. Copy-Local references saved as embedded resources
The AfterResolveReferences target is a target defined by the normal build process, but deliberately left empty so you can override it and inject your own logic into the build. It happens after the ResolveAssemblyReference task is run; that task follows up your project references and determines their physical locations and other properties, and it just happens to output the ReferenceCopyLocalPaths item which contains the paths of all the assemblies that are copy-local assemblies. So our task above creates a new EmbeddedResource item for each of these paths, excluding all the paths that are not to .dll files (for example, the associated .pdb and .xml files). The name of the embedded resource (the LogicalName) is set to be the path and filename of the assembly file. Why the path and not just the filename, you ask? Well, some assemblies are put under subdirectories in your bin folder because they have the same file name, but differ in culture (for example, Microsoft.Expression.Interactions.resources.dll & System.Windows.Interactivity.resources.dll). If we didn’t include the path in the resource name, we would get conflicting resource names. The results of this MSBuild task can be seen in Figure 1.

Figure 2. Select your program entry point
Once I had all the copy-local assemblies stored safely inside the executable as embedded resources, I figured out a way of getting the assembly resolution hook hooked up before any WPF code starts (and therefore requiring my copy-local assemblies to be loaded before the hook is set up). Normally WPF applications contain an App.xaml file, which acts as a magic entry point to the application and launches the first window. However, the App.xaml isn’t actually that magical. If you look inside the obj folder in your project folder, you will find an App.g.cs file, which is generated from your App.xaml. It contains a normal “static void Main” C# entry point. So in order to get in before WPF, all you need to do is define your own entry point in a new class, do what you need to, then call the normal WPF entry-point and innocently act like nothing unusual has happened. (This will require you to change your project settings and specifically choose your application’s entry point (see Figure 2)). This is what my class looked like:
public class Program
{
    [STAThreadAttribute]
    public static void Main()
    {
        App.Main();
    }
}
Don’t forget the STAThreadAttribute on Main; if you leave it out, your application will crash on startup. With this class in place, I was able to easily hook in my custom assembly loading code before the WPF code ran at all:
public class Program
{
    [STAThreadAttribute]
    public static void Main()
    {
        AppDomain.CurrentDomain.AssemblyResolve += OnResolveAssembly;
        App.Main();
    }

    private static Assembly OnResolveAssembly(object sender, ResolveEventArgs args)
    {
        Assembly executingAssembly = Assembly.GetExecutingAssembly();
        AssemblyName assemblyName = new AssemblyName(args.Name);

        string path = assemblyName.Name + ".dll";
        if (assemblyName.CultureInfo.Equals(CultureInfo.InvariantCulture) == false)
        {
            path = String.Format(@"{0}\{1}", assemblyName.CultureInfo, path);
        }

        using (Stream stream = executingAssembly.GetManifestResourceStream(path))
        {
            if (stream == null)
                return null;

            byte[] assemblyRawBytes = new byte[stream.Length];
            stream.Read(assemblyRawBytes, 0, assemblyRawBytes.Length);
            return Assembly.Load(assemblyRawBytes);
        }
    }
}
The code above registers for the AssemblyResolve event off of the current application domain. That event is fired when the CLR is unable to locate a referenced assembly and allows you to provide it with one. The code checks if the wanted assembly has a non-invariant culture and if it does, attempts to load it from the “subfolder” (really just a prefix on the resource name) named after the culture. This bit is what I assume .NET does when it looks for those assemblies normally, but I haven’t seen any documentation to confirm it, so keep an eye on that part’s behaviour when you use it. The code then goes on to load the assembly out of the resources and return it to the framework for use. This code is slightly improved from our daring New Zealander’s code (other than the culture behaviour) as it handles the case where the assembly can’t be found in the resources and simply returns null (after which your program will crash with an exception complaining about the missing assembly, which is a tad clearer than the NullReferenceException you would have got otherwise).
In conclusion, all these changes together mean you can simply hit build in your project and the necessary assemblies will be automatically included as resources in your executable to be pulled out at runtime and loaded by the assembly resolution hook. This means you can simply copy just your executable to any location without its associated referenced assemblies and it will run just fine.
Automatically recording the Mercurial revision hash using MSBuild
November 12, 2010 2:33 PM by Daniel Chambers
On one of the websites I’ve worked on recently we chose to display the website’s version ID at the bottom of each page. Since we use Mercurial for version control (it’s totally awesome, by the way. I hope to never go back to Subversion), that means we display a truncated copy of the revision’s hash. The website is a pet project and my friend and I manage it informally, so having the hash displayed there allows us to easily remember which version is currently running on Live. It’s an ASP.NET MVC site, so I created a ConfigurationSection that I separated out into its own Revision.config file, into which we manually copy and paste the revision hash just before we upload the new version to the live server. As VS2010’s new web publishing features means that publishing a directly deployable copy of the website is literally a one-click affair, this manual step galled me. So I set out to figure out how I could automate it.
I spent a while digging around in the undocumented mess that is the MSBuild script that backs the web publishing features (as I discussed in a previous blog) and learning about MSBuild and I eventually developed a final implementation which is actually quite simple. The first step was to get the Mercurial revision hash into MSBuild; to do this I developed a small MSBuild task that simply uses the command-line hg.exe to get the hash and parses it out of its console output. The code is pretty self-explanatory, so take a look:
public class MercurialVersionTask : Task
{
    [Required]
    public string RepositoryPath { get; set; }

    [Output]
    public string MercurialVersion { get; set; }

    public override bool Execute()
    {
        try
        {
            MercurialVersion = GetMercurialVersion(RepositoryPath);
            Log.LogMessage(MessageImportance.Low, String.Format("Mercurial revision for repository \"{0}\" is {1}", RepositoryPath, MercurialVersion));
            return true;
        }
        catch (Exception e)
        {
            Log.LogError("Could not get the mercurial revision, unhandled exception occurred!");
            Log.LogErrorFromException(e, true, true, RepositoryPath);
            return false;
        }
    }

    private string GetMercurialVersion(string repositoryPath)
    {
        Process hg = new Process();
        hg.StartInfo.UseShellExecute = false;
        hg.StartInfo.RedirectStandardError = true;
        hg.StartInfo.RedirectStandardOutput = true;
        hg.StartInfo.CreateNoWindow = true;
        hg.StartInfo.FileName = "hg";
        hg.StartInfo.Arguments = "id";
        hg.StartInfo.WorkingDirectory = repositoryPath;
        hg.Start();

        string output = hg.StandardOutput.ReadToEnd().Trim();
        string error = hg.StandardError.ReadToEnd().Trim();

        Log.LogMessage(MessageImportance.Low, "hg.exe Standard Output: {0}", output);
        Log.LogMessage(MessageImportance.Low, "hg.exe Standard Error: {0}", error);

        hg.WaitForExit();

        if (String.IsNullOrEmpty(error) == false)
            throw new Exception(String.Format("hg.exe error: {0}", error));

        string[] tokens = output.Split(' ');
        return tokens[0];
    }
}
I created a new MsBuild project in DigitallyCreated Utilities to house this class (and any others I may develop in the future). At the time of writing, you’ll need to get the code from the repository and compile it yourself, as I haven’t released an official build with it in it yet.
I then needed to start using this task in the website’s project file. A one-liner near the top of the file imports it and makes it available for use:
<UsingTask AssemblyFile="..\lib\DigitallyCreated.Utilities.MsBuild.dll" TaskName="DigitallyCreated.Utilities.MsBuild.MercurialVersionTask" />
Next, I wrote the target that would use this task to set the hash into the Revision.config file. I decided to use the really nice tasks provided by the MSBuild Extension Pack project to do this. This meant I needed to also import their tasks into the project (after installing the pack, of course), in at the top of the file:
<PropertyGroup>
    <ExtensionTasksPath>$(MSBuildExtensionsPath32)\ExtensionPack\4.0\</ExtensionTasksPath>
</PropertyGroup>
<Import Project="$(ExtensionTasksPath)MSBuild.ExtensionPack.tasks" />
Writing the hash-setting target was very easy:
<Target Name="SetMercurialRevisionInConfig">
    <DigitallyCreated.Utilities.MsBuild.MercurialVersionTask RepositoryPath="$(MSBuildProjectDirectory)">
        <Output TaskParameter="MercurialVersion" PropertyName="MercurialVersion" />
    </DigitallyCreated.Utilities.MsBuild.MercurialVersionTask>
    <MSBuild.ExtensionPack.Xml.XmlFile File="$(_PackageTempDir)\Revision.config" TaskAction="UpdateAttribute" XPath="/revision" Key="hash" Value="$(MercurialVersion)" />
</Target>
The MercurialVersionTask is called, which gets the revision hash and puts it into the MecurialVersion property (as specified by the nested Output tag). The XmlFile task sets that hash into the Revision.config, which is found in the directory specified by _PackageTempDir. That directory is the directory that the VS2010 web publishing pipeline puts the project files while it is packaging them for a publish. That property is set by their MSBuild code; it is, however, subject to disappear in the future, as indicated by the underscore in the name that tells you that it’s a ‘private’ property, so be careful there.
Next I needed to find a place in the VS2010 web publishing MSBuild pipeline where I could hook in that target. Thankfully, the pipeline allows you to easily hook in your own targets by setting properties containing the names of the targets you’d like it to run. So, inside the first PropertyGroup tag at the top of the project file, I set this property, hooking in my target to be run after the PipelinePreDeployCopyAllFilesToOneFolder target:
<OnAfterPipelinePreDeployCopyAllFilesToOneFolder>SetMercurialRevisionInConfig;</OnAfterPipelinePreDeployCopyAllFilesToOneFolder>
This ensures that the target will be run after the CopyAllFilesToSingleFolderForPackage target runs (that target is run by the PipelinePreDeployCopyAllFilesToOneFolder target). The CopyAllFilesToSingleFolderForPackage target copies the project files into your obj folder (specifically the folder specified by _PackageTempDir) in preparation for a publish (this is discussed in a little more detail in that previous post).
And that was it! Upon publishing using Visual Studio (or at the command-line using the process detailed in that previous post), the SetMercurialRevisionInConfig target is called by the web publishing pipeline and sets the hash into the Revision.config file. This means that a deployable build of our website can literally be created with a single click in Visual Studio. Projects that use a continuous integration server to build their projects would also find this very useful.
Removing a Windows System Certificate Store
October 18, 2010 11:30 AM by Daniel Chambers
Recently I managed to add an extra certificate store to Windows by mistake, as I accidentally left out a command line argument when using makecert. Unfortunately, the Certificates MMC snap-in doesn’t seem to provide a way for you to delete a certificate store, so I had resort to a more technical approach in order to get rid of this new unwanted certificate store.

Digging around in the Windows API, I found the CertUnregisterSystemStore function that allows you to delete a certificate store programmatically. So I spun up my copy of LINQPad so that I could quickly script in C# and PInvoke that function. (Incidentally, if you don’t have a copy of LINQPad and you’re a .NET developer, you need to get yourself a copy immediately. It’s invaluable.) Unfortunately, CertUnregisterSystemStore takes a flags parameter, and the actual values of the different flags are defined in C++ .h files, which are not available from C#. So I punched out a few PowerShell commands to search the .h files in the Windows SDK for those #define lines.

Once those flag values were found, deleting the store ended up being this small C# script in LINQPad that simply calls CertUnregisterSystemStore with the appropriate flags:
void Main()
{
    int CERT_SYSTEM_STORE_LOCATION_SHIFT = 16;
    uint CERT_SYSTEM_STORE_CURRENT_USER_ID = 1;
    uint CERT_SYSTEM_STORE_LOCAL_MACHINE_ID = 2;

    uint CERT_STORE_DELETE_FLAG = 0x10;
    uint CERT_SYSTEM_STORE_CURRENT_USER = CERT_SYSTEM_STORE_CURRENT_USER_ID << CERT_SYSTEM_STORE_LOCATION_SHIFT;
    uint CERT_SYSTEM_STORE_LOCAL_MACHINE = CERT_SYSTEM_STORE_LOCAL_MACHINE_ID << CERT_SYSTEM_STORE_LOCATION_SHIFT;

    CertUnregisterSystemStore("TestCertificate.cer", CERT_STORE_DELETE_FLAG | CERT_SYSTEM_STORE_CURRENT_USER);
}

[DllImport("crypt32.dll", CharSet = CharSet.Unicode)]
public static extern bool CertUnregisterSystemStore(string systemStore, uint flags);
I’ve also included the flags needed to delete stores from the local machine (as opposed to the current user account) in the script above, in case anyone ever needs to do that.