Only showing posts tagged with "WPF"
Combining multiple assemblies into a single EXE for a WPF application
December 23, 2010 4:22 PM by Daniel Chambers
Recently I’ve been writing a small WPF application for work where the goal is to be able to allow its users to download a single .exe file onto a server machine they are working on, use the executable, then delete it once they are done on that server. The servers in question have a strict software installation policy, so this application cannot have an installer and therefore must be as easy to ‘deploy’ as possible. Unfortunately, pretty much every .NET project is always going to reference some 3rd party assemblies that will be placed alongside the executable upon deploy. Microsoft has a tool called ILMerge that is capable of merging .NET assemblies together, except that it is unable to do so for WPF assemblies, since they contain XAML which contains baked in assembly references. While thinking about the issue, I supposed that I could’ve simply provided our users with a zip file that contained a folder with the WPF executable and its referenced assemblies inside it, and get them to extract that, go into the folder and find and run the executable, but that just felt dirty.
Searching around the internet found me a very useful post by an adventuring New Zealander, which introduced me to the idea of storing the referenced assemblies inside the WPF executable as embedded resources, and then using an assembly resolution hook to load the the assembly out of the resources and provide it to the CLR for use. Unfortunately, our swashbuckling New Zealander’s code didn’t work for my particular project, as it set up the assembly resolution hook after my application was trying to find its assemblies. He also didn’t mention a clean way of automatically including those referenced assemblies as resources, which I wanted as I didn’t want to be manually including my assemblies as resources in my project file. However, his blog post planted the seed of what is to come, so props to him for that.
I dug around in MSBuild and figured out a way of hooking off the normal build process and dynamically adding any project references that are going to be copied locally (ie copied into the bin directory, alongside the exe file) as resources to be embedded. This turned out to be quite simple (this code snippet should be added to your project file underneath where the standard Microsoft.CSharp.targets file is imported):
<Target Name="AfterResolveReferences">
  <ItemGroup>
    <EmbeddedResource Include="@(ReferenceCopyLocalPaths)" Condition="'%(ReferenceCopyLocalPaths.Extension)' == '.dll'">
      <LogicalName>%(ReferenceCopyLocalPaths.DestinationSubDirectory)%(ReferenceCopyLocalPaths.Filename)%(ReferenceCopyLocalPaths.Extension)</LogicalName>
    </EmbeddedResource>
  </ItemGroup>
</Target>

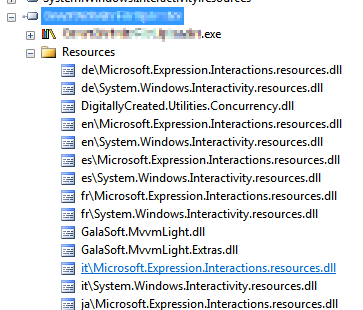
Figure 1. Copy-Local references saved as embedded resources
The AfterResolveReferences target is a target defined by the normal build process, but deliberately left empty so you can override it and inject your own logic into the build. It happens after the ResolveAssemblyReference task is run; that task follows up your project references and determines their physical locations and other properties, and it just happens to output the ReferenceCopyLocalPaths item which contains the paths of all the assemblies that are copy-local assemblies. So our task above creates a new EmbeddedResource item for each of these paths, excluding all the paths that are not to .dll files (for example, the associated .pdb and .xml files). The name of the embedded resource (the LogicalName) is set to be the path and filename of the assembly file. Why the path and not just the filename, you ask? Well, some assemblies are put under subdirectories in your bin folder because they have the same file name, but differ in culture (for example, Microsoft.Expression.Interactions.resources.dll & System.Windows.Interactivity.resources.dll). If we didn’t include the path in the resource name, we would get conflicting resource names. The results of this MSBuild task can be seen in Figure 1.

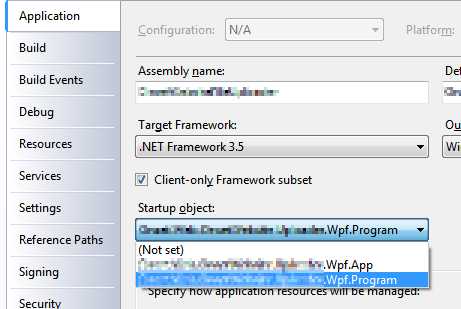
Figure 2. Select your program entry point
Once I had all the copy-local assemblies stored safely inside the executable as embedded resources, I figured out a way of getting the assembly resolution hook hooked up before any WPF code starts (and therefore requiring my copy-local assemblies to be loaded before the hook is set up). Normally WPF applications contain an App.xaml file, which acts as a magic entry point to the application and launches the first window. However, the App.xaml isn’t actually that magical. If you look inside the obj folder in your project folder, you will find an App.g.cs file, which is generated from your App.xaml. It contains a normal “static void Main” C# entry point. So in order to get in before WPF, all you need to do is define your own entry point in a new class, do what you need to, then call the normal WPF entry-point and innocently act like nothing unusual has happened. (This will require you to change your project settings and specifically choose your application’s entry point (see Figure 2)). This is what my class looked like:
public class Program
{
    [STAThreadAttribute]
    public static void Main()
    {
        App.Main();
    }
}
Don’t forget the STAThreadAttribute on Main; if you leave it out, your application will crash on startup. With this class in place, I was able to easily hook in my custom assembly loading code before the WPF code ran at all:
public class Program
{
    [STAThreadAttribute]
    public static void Main()
    {
        AppDomain.CurrentDomain.AssemblyResolve += OnResolveAssembly;
        App.Main();
    }

    private static Assembly OnResolveAssembly(object sender, ResolveEventArgs args)
    {
        Assembly executingAssembly = Assembly.GetExecutingAssembly();
        AssemblyName assemblyName = new AssemblyName(args.Name);

        string path = assemblyName.Name + ".dll";
        if (assemblyName.CultureInfo.Equals(CultureInfo.InvariantCulture) == false)
        {
            path = String.Format(@"{0}\{1}", assemblyName.CultureInfo, path);
        }

        using (Stream stream = executingAssembly.GetManifestResourceStream(path))
        {
            if (stream == null)
                return null;

            byte[] assemblyRawBytes = new byte[stream.Length];
            stream.Read(assemblyRawBytes, 0, assemblyRawBytes.Length);
            return Assembly.Load(assemblyRawBytes);
        }
    }
}
The code above registers for the AssemblyResolve event off of the current application domain. That event is fired when the CLR is unable to locate a referenced assembly and allows you to provide it with one. The code checks if the wanted assembly has a non-invariant culture and if it does, attempts to load it from the “subfolder” (really just a prefix on the resource name) named after the culture. This bit is what I assume .NET does when it looks for those assemblies normally, but I haven’t seen any documentation to confirm it, so keep an eye on that part’s behaviour when you use it. The code then goes on to load the assembly out of the resources and return it to the framework for use. This code is slightly improved from our daring New Zealander’s code (other than the culture behaviour) as it handles the case where the assembly can’t be found in the resources and simply returns null (after which your program will crash with an exception complaining about the missing assembly, which is a tad clearer than the NullReferenceException you would have got otherwise).
In conclusion, all these changes together mean you can simply hit build in your project and the necessary assemblies will be automatically included as resources in your executable to be pulled out at runtime and loaded by the assembly resolution hook. This means you can simply copy just your executable to any location without its associated referenced assemblies and it will run just fine.
