Only showing posts tagged with "MSBuild"
Incremental Builds in MSBuild and How to Avoid Breaking Them
June 26, 2011 2:50 PM by Daniel Chambers
One of my recent tasks at a client has been to help improve the speed of their build process. They have around 140 projects in their main Visual Studio solution, and one of the problems they had was that if they changed some code in a unit\integration test project at the bottom of the compile chain, Visual Studio would rebuild most of the projects that the test project depended upon either directly or indirectly, wasting developer time as she or he is forced to wait a minute or two while everything compiles. This is obviously unnecessary, as changing code in only the test project should only require a rebuild of the test project and not its unchanged dependencies. Visual Studio is capable of avoiding unnecessary rebuilds, as its build system is powered by MSBuild, but unless you understand how this system works it is possible to accidentally break it.
MSBuild supports the idea of “incremental builds”. Essentially, each MSBuild target (such as Build, Clean, etc) can be told what its input and output files are. If you think about a target that takes source code and produces an assembly, the inputs are the source code files and the outputs are the compiled assembly. MSBuild checks the timestamps of the input files and if they are newer than the timestamps of the output files, it assumes the outputs are out of date and need to be regenerated by whatever process is contained within the target. If the output files are the same age or older than the input files, MSBuild will skip the target.
Here’s a practical example. Create a folder on your computer somewhere and create a Project.proj file in it which can contain this:
<?xml version="1.0" encoding="utf-8"?>
<Project ToolsVersion="4.0" DefaultTargets="CopyFiles" xmlns="http://schemas.microsoft.com/developer/msbuild/2003">
    <PropertyGroup>
        <DestinationFolder>Destination</DestinationFolder>
    </PropertyGroup>

    <ItemGroup>
        <File Include="Source.txt"/>
    </ItemGroup>

    <Target Name="CopyFiles"
            Inputs="@(File)"
            Outputs="@(File -> '$(DestinationFolder)\%(RelativeDir)%(Filename)%(Extension)')">

        <Copy SourceFiles="@(File)" DestinationFolder="$(DestinationFolder)" />

    </Target>
</Project>
This is a very simple MSBuild script that copies the files specified by the File items into the DestinationFolder. Note how the CopyFiles target has its input set to the File items and the outputs set to the copied files (that “–>” syntax is an MSBuild transform that transforms the paths specified by the File items into their matching copy destination paths).
If you create that Source.txt file next to the .proj file and run MSBuild in that folder, you will see it create the Destination folder and copy Source.txt in there. It didn’t skip the CopyFiles target because it looked for the output (Destination\Source.txt) and couldn’t find it.
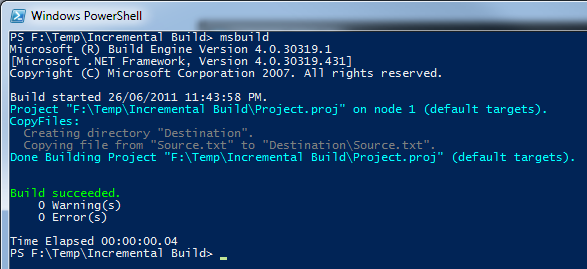
MSBuild copies the file as the output file does not exist
However, If you run MSBuild again you will notice that it skips the CopyFiles target as it has figured out that the timestamp on Source.txt is the same as the timestamp on Destination\Source.txt and therefore it doesn’t need to run the CopyFiles target again.
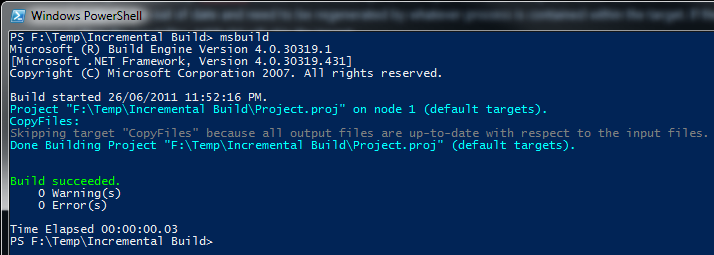
MSBuild skips the copy as the output is the same age as the input
Now if you go change the contents of Source.txt and run MSBuild again, you’ll notice that it will copy the file over again, as it notes the input file is now newer than the output file.
As Visual Studio uses MSBuild to power the build process, it supports incremental builds too. Files in your project (such as source files) as used as input files within Microsoft’s build pipeline and the generated outputs are things like assembly files, XMLDoc files, etc. So if your source files are newer than your assembly, Visual Studio will rebuild the assembly.
However, some parts of the build pipeline are not intelligent about input and output files and as such, when you use them, you can accidentally break incremental builds. In particular, it’s quite easy to break incremental builds by using pre-build events in Visual Studio. For example, imagine you were using the pre-build event to run a custom executable that generates some C# code from an XML file, where this C# code is included in your project and will be compiled into your assembly:
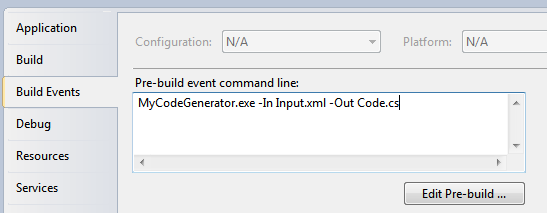
Some custom code generation being performed in a pre-build event in Visual Studio
Unfortunately, since you can put whatever you like in the pre-build event box, MSBuild has no way of determining what are the input files and what are the output files involved when running the stuff you enter in there, so it just runs it every time. This has the nasty effect, in this case, of regenerating Code.cs upon every build (assuming MyCodeGenerator.exe isn’t smart enough to detect that it doesn’t need to do a regeneration), which will break incremental builds as now one of the inputs for your assembly (Code.cs) is newer than the last built assembly!
Thankfully this is easy to fix by moving your call to MyCodeGenerator.exe out of the pre-build event and into a custom MSBuild target like so:
<ItemGroup>
    <CodeGenInput Include="Input.xml">
        <Visible>false</Visible>
    </CodeGenInput>

    <CodeGenOutput Include="Code.cs">
        <Visible>false</Visible>
    </CodeGenOutput>
</ItemGroup>

<Target Name="GenerateCode" Inputs="@(CodeGenInput)" Outputs="@(CodeGenOutput)">
    <Exec Command="MyCodeGenerator.exe -In @(CodeGenInput) -Out @(CodeGenOutput)" />
</Target>

<Target Name="BeforeBuild" DependsOnTargets="GenerateCode">
</Target>
The above MSBuild snippet defines both the input file and the output file as items, with the Visible metadata set to false in order to stop the items from showing up in Visual Studio. The GenerateCode target is hooked into the Microsoft build pipeline by defining the standard BeforeBuild target and specifying that it depends upon the GenerateCode target. This will cause it to run before the build process starts. The target does what the pre-build event did before, but now the inputs and the outputs are defined, which allows MSBuild to successfully skip the code generation where necessary.
In conclusion, we’ve seen how it is well within MSBuild’s (and therefore Visual Studio’s) ability to perform incremental builds, skipping time consuming targets in order to not repeat work unnecessarily. You may not notice the saved time on small projects, but when you start having build processes that take minutes to complete builds, incremental builds can start saving you lots of time as one minute over and over again in every day adds up to a lot of time very quickly! It can be easy to break incremental builds by using the build events in Visual Studio to change input files at build time, but now that you’re armed with the knowledge of how incremental builds work, you can easily shift those tasks into proper targets in your project file and support incremental builds.
Combining multiple assemblies into a single EXE for a WPF application
December 23, 2010 4:22 PM by Daniel Chambers
Recently I’ve been writing a small WPF application for work where the goal is to be able to allow its users to download a single .exe file onto a server machine they are working on, use the executable, then delete it once they are done on that server. The servers in question have a strict software installation policy, so this application cannot have an installer and therefore must be as easy to ‘deploy’ as possible. Unfortunately, pretty much every .NET project is always going to reference some 3rd party assemblies that will be placed alongside the executable upon deploy. Microsoft has a tool called ILMerge that is capable of merging .NET assemblies together, except that it is unable to do so for WPF assemblies, since they contain XAML which contains baked in assembly references. While thinking about the issue, I supposed that I could’ve simply provided our users with a zip file that contained a folder with the WPF executable and its referenced assemblies inside it, and get them to extract that, go into the folder and find and run the executable, but that just felt dirty.
Searching around the internet found me a very useful post by an adventuring New Zealander, which introduced me to the idea of storing the referenced assemblies inside the WPF executable as embedded resources, and then using an assembly resolution hook to load the the assembly out of the resources and provide it to the CLR for use. Unfortunately, our swashbuckling New Zealander’s code didn’t work for my particular project, as it set up the assembly resolution hook after my application was trying to find its assemblies. He also didn’t mention a clean way of automatically including those referenced assemblies as resources, which I wanted as I didn’t want to be manually including my assemblies as resources in my project file. However, his blog post planted the seed of what is to come, so props to him for that.
I dug around in MSBuild and figured out a way of hooking off the normal build process and dynamically adding any project references that are going to be copied locally (ie copied into the bin directory, alongside the exe file) as resources to be embedded. This turned out to be quite simple (this code snippet should be added to your project file underneath where the standard Microsoft.CSharp.targets file is imported):
<Target Name="AfterResolveReferences">
  <ItemGroup>
    <EmbeddedResource Include="@(ReferenceCopyLocalPaths)" Condition="'%(ReferenceCopyLocalPaths.Extension)' == '.dll'">
      <LogicalName>%(ReferenceCopyLocalPaths.DestinationSubDirectory)%(ReferenceCopyLocalPaths.Filename)%(ReferenceCopyLocalPaths.Extension)</LogicalName>
    </EmbeddedResource>
  </ItemGroup>
</Target>
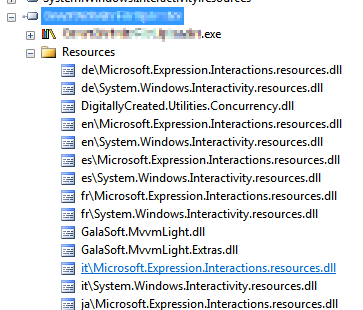
Figure 1. Copy-Local references saved as embedded resources
The AfterResolveReferences target is a target defined by the normal build process, but deliberately left empty so you can override it and inject your own logic into the build. It happens after the ResolveAssemblyReference task is run; that task follows up your project references and determines their physical locations and other properties, and it just happens to output the ReferenceCopyLocalPaths item which contains the paths of all the assemblies that are copy-local assemblies. So our task above creates a new EmbeddedResource item for each of these paths, excluding all the paths that are not to .dll files (for example, the associated .pdb and .xml files). The name of the embedded resource (the LogicalName) is set to be the path and filename of the assembly file. Why the path and not just the filename, you ask? Well, some assemblies are put under subdirectories in your bin folder because they have the same file name, but differ in culture (for example, Microsoft.Expression.Interactions.resources.dll & System.Windows.Interactivity.resources.dll). If we didn’t include the path in the resource name, we would get conflicting resource names. The results of this MSBuild task can be seen in Figure 1.
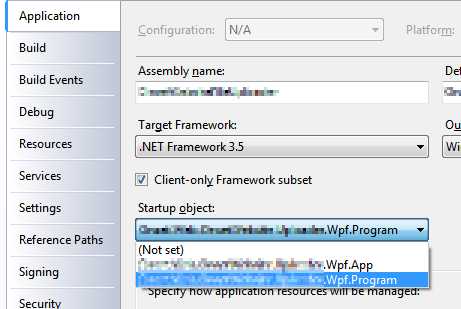
Figure 2. Select your program entry point
Once I had all the copy-local assemblies stored safely inside the executable as embedded resources, I figured out a way of getting the assembly resolution hook hooked up before any WPF code starts (and therefore requiring my copy-local assemblies to be loaded before the hook is set up). Normally WPF applications contain an App.xaml file, which acts as a magic entry point to the application and launches the first window. However, the App.xaml isn’t actually that magical. If you look inside the obj folder in your project folder, you will find an App.g.cs file, which is generated from your App.xaml. It contains a normal “static void Main” C# entry point. So in order to get in before WPF, all you need to do is define your own entry point in a new class, do what you need to, then call the normal WPF entry-point and innocently act like nothing unusual has happened. (This will require you to change your project settings and specifically choose your application’s entry point (see Figure 2)). This is what my class looked like:
public class Program
{
    [STAThreadAttribute]
    public static void Main()
    {
        App.Main();
    }
}
Don’t forget the STAThreadAttribute on Main; if you leave it out, your application will crash on startup. With this class in place, I was able to easily hook in my custom assembly loading code before the WPF code ran at all:
public class Program
{
    [STAThreadAttribute]
    public static void Main()
    {
        AppDomain.CurrentDomain.AssemblyResolve += OnResolveAssembly;
        App.Main();
    }

    private static Assembly OnResolveAssembly(object sender, ResolveEventArgs args)
    {
        Assembly executingAssembly = Assembly.GetExecutingAssembly();
        AssemblyName assemblyName = new AssemblyName(args.Name);

        string path = assemblyName.Name + ".dll";
        if (assemblyName.CultureInfo.Equals(CultureInfo.InvariantCulture) == false)
        {
            path = String.Format(@"{0}\{1}", assemblyName.CultureInfo, path);
        }

        using (Stream stream = executingAssembly.GetManifestResourceStream(path))
        {
            if (stream == null)
                return null;

            byte[] assemblyRawBytes = new byte[stream.Length];
            stream.Read(assemblyRawBytes, 0, assemblyRawBytes.Length);
            return Assembly.Load(assemblyRawBytes);
        }
    }
}
The code above registers for the AssemblyResolve event off of the current application domain. That event is fired when the CLR is unable to locate a referenced assembly and allows you to provide it with one. The code checks if the wanted assembly has a non-invariant culture and if it does, attempts to load it from the “subfolder” (really just a prefix on the resource name) named after the culture. This bit is what I assume .NET does when it looks for those assemblies normally, but I haven’t seen any documentation to confirm it, so keep an eye on that part’s behaviour when you use it. The code then goes on to load the assembly out of the resources and return it to the framework for use. This code is slightly improved from our daring New Zealander’s code (other than the culture behaviour) as it handles the case where the assembly can’t be found in the resources and simply returns null (after which your program will crash with an exception complaining about the missing assembly, which is a tad clearer than the NullReferenceException you would have got otherwise).
In conclusion, all these changes together mean you can simply hit build in your project and the necessary assemblies will be automatically included as resources in your executable to be pulled out at runtime and loaded by the assembly resolution hook. This means you can simply copy just your executable to any location without its associated referenced assemblies and it will run just fine.
Automatically recording the Mercurial revision hash using MSBuild
November 12, 2010 2:33 PM by Daniel Chambers
On one of the websites I’ve worked on recently we chose to display the website’s version ID at the bottom of each page. Since we use Mercurial for version control (it’s totally awesome, by the way. I hope to never go back to Subversion), that means we display a truncated copy of the revision’s hash. The website is a pet project and my friend and I manage it informally, so having the hash displayed there allows us to easily remember which version is currently running on Live. It’s an ASP.NET MVC site, so I created a ConfigurationSection that I separated out into its own Revision.config file, into which we manually copy and paste the revision hash just before we upload the new version to the live server. As VS2010’s new web publishing features means that publishing a directly deployable copy of the website is literally a one-click affair, this manual step galled me. So I set out to figure out how I could automate it.
I spent a while digging around in the undocumented mess that is the MSBuild script that backs the web publishing features (as I discussed in a previous blog) and learning about MSBuild and I eventually developed a final implementation which is actually quite simple. The first step was to get the Mercurial revision hash into MSBuild; to do this I developed a small MSBuild task that simply uses the command-line hg.exe to get the hash and parses it out of its console output. The code is pretty self-explanatory, so take a look:
public class MercurialVersionTask : Task
{
    [Required]
    public string RepositoryPath { get; set; }

    [Output]
    public string MercurialVersion { get; set; }

    public override bool Execute()
    {
        try
        {
            MercurialVersion = GetMercurialVersion(RepositoryPath);
            Log.LogMessage(MessageImportance.Low, String.Format("Mercurial revision for repository \"{0}\" is {1}", RepositoryPath, MercurialVersion));
            return true;
        }
        catch (Exception e)
        {
            Log.LogError("Could not get the mercurial revision, unhandled exception occurred!");
            Log.LogErrorFromException(e, true, true, RepositoryPath);
            return false;
        }
    }

    private string GetMercurialVersion(string repositoryPath)
    {
        Process hg = new Process();
        hg.StartInfo.UseShellExecute = false;
        hg.StartInfo.RedirectStandardError = true;
        hg.StartInfo.RedirectStandardOutput = true;
        hg.StartInfo.CreateNoWindow = true;
        hg.StartInfo.FileName = "hg";
        hg.StartInfo.Arguments = "id";
        hg.StartInfo.WorkingDirectory = repositoryPath;
        hg.Start();

        string output = hg.StandardOutput.ReadToEnd().Trim();
        string error = hg.StandardError.ReadToEnd().Trim();

        Log.LogMessage(MessageImportance.Low, "hg.exe Standard Output: {0}", output);
        Log.LogMessage(MessageImportance.Low, "hg.exe Standard Error: {0}", error);

        hg.WaitForExit();

        if (String.IsNullOrEmpty(error) == false)
            throw new Exception(String.Format("hg.exe error: {0}", error));

        string[] tokens = output.Split(' ');
        return tokens[0];
    }
}
I created a new MsBuild project in DigitallyCreated Utilities to house this class (and any others I may develop in the future). At the time of writing, you’ll need to get the code from the repository and compile it yourself, as I haven’t released an official build with it in it yet.
I then needed to start using this task in the website’s project file. A one-liner near the top of the file imports it and makes it available for use:
<UsingTask AssemblyFile="..\lib\DigitallyCreated.Utilities.MsBuild.dll" TaskName="DigitallyCreated.Utilities.MsBuild.MercurialVersionTask" />
Next, I wrote the target that would use this task to set the hash into the Revision.config file. I decided to use the really nice tasks provided by the MSBuild Extension Pack project to do this. This meant I needed to also import their tasks into the project (after installing the pack, of course), in at the top of the file:
<PropertyGroup>
    <ExtensionTasksPath>$(MSBuildExtensionsPath32)\ExtensionPack\4.0\</ExtensionTasksPath>
</PropertyGroup>
<Import Project="$(ExtensionTasksPath)MSBuild.ExtensionPack.tasks" />
Writing the hash-setting target was very easy:
<Target Name="SetMercurialRevisionInConfig">
    <DigitallyCreated.Utilities.MsBuild.MercurialVersionTask RepositoryPath="$(MSBuildProjectDirectory)">
        <Output TaskParameter="MercurialVersion" PropertyName="MercurialVersion" />
    </DigitallyCreated.Utilities.MsBuild.MercurialVersionTask>
    <MSBuild.ExtensionPack.Xml.XmlFile File="$(_PackageTempDir)\Revision.config" TaskAction="UpdateAttribute" XPath="/revision" Key="hash" Value="$(MercurialVersion)" />
</Target>
The MercurialVersionTask is called, which gets the revision hash and puts it into the MecurialVersion property (as specified by the nested Output tag). The XmlFile task sets that hash into the Revision.config, which is found in the directory specified by _PackageTempDir. That directory is the directory that the VS2010 web publishing pipeline puts the project files while it is packaging them for a publish. That property is set by their MSBuild code; it is, however, subject to disappear in the future, as indicated by the underscore in the name that tells you that it’s a ‘private’ property, so be careful there.
Next I needed to find a place in the VS2010 web publishing MSBuild pipeline where I could hook in that target. Thankfully, the pipeline allows you to easily hook in your own targets by setting properties containing the names of the targets you’d like it to run. So, inside the first PropertyGroup tag at the top of the project file, I set this property, hooking in my target to be run after the PipelinePreDeployCopyAllFilesToOneFolder target:
<OnAfterPipelinePreDeployCopyAllFilesToOneFolder>SetMercurialRevisionInConfig;</OnAfterPipelinePreDeployCopyAllFilesToOneFolder>
This ensures that the target will be run after the CopyAllFilesToSingleFolderForPackage target runs (that target is run by the PipelinePreDeployCopyAllFilesToOneFolder target). The CopyAllFilesToSingleFolderForPackage target copies the project files into your obj folder (specifically the folder specified by _PackageTempDir) in preparation for a publish (this is discussed in a little more detail in that previous post).
And that was it! Upon publishing using Visual Studio (or at the command-line using the process detailed in that previous post), the SetMercurialRevisionInConfig target is called by the web publishing pipeline and sets the hash into the Revision.config file. This means that a deployable build of our website can literally be created with a single click in Visual Studio. Projects that use a continuous integration server to build their projects would also find this very useful.
Locally publishing a VS2010 ASP.NET web application using MSBuild
November 04, 2010 3:13 AM by Daniel Chambers
Visual Studio 2010 has great new Web Application Project publishing features that allow you to easy publish your web app project with a click of a button. Behind the scenes the Web.config transformation and package building is done by a massive MSBuild script that’s imported into your project file (found at: C:\Program Files (x86)\MSBuild\Microsoft\VisualStudio\v10.0\Web\Microsoft.Web.Publishing.targets). Unfortunately, the script is hugely complicated, messy and undocumented (other then some oft-badly spelled and mostly useless comments in the file). A big flowchart of that file and some documentation about how to hook into it would be nice, but seems to be sadly lacking (or at least I can’t find it).
Unfortunately, this means performing publishing via the command line is much more opaque than it needs to be. I was surprised by the lack of documentation in this area, because these days many shops use a continuous integration server and some even do automated deployment (which the VS2010 publishing features could help a lot with), so I would have thought that enabling this (easily!) would be have been a fairly main requirement for the feature.
Anyway, after digging through the Microsoft.Web.Publishing.targets file for hours and banging my head against the trial and error wall, I’ve managed to figure out how Visual Studio seems to perform its magic one click “Publish to File System” and “Build Deployment Package” features. I’ll be getting into a bit of MSBuild scripting, so if you’re not familiar with MSBuild I suggest you check out this crash course MSDN page.
Publish to File System
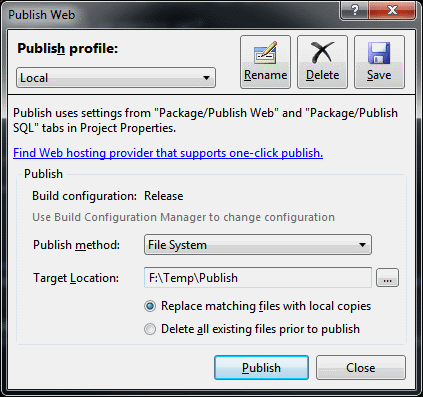
The VS2010 Publish To File System Dialog
Publish to File System took me a while to nut out because I expected some sensible use of MSBuild to be occurring. Instead, VS2010 does something quite weird: it calls on MSBuild to perform a sort of half-deploy that prepares the web app’s files in your project’s obj folder, then it seems to do a manual copy of those files (ie. outside of MSBuild) into your target publish folder. This is really whack behaviour because MSBuild is designed to copy files around (and other build-related things), so it’d make sense if the whole process was just one MSBuild target that VS2010 called on, not a target then a manual copy.
This means that doing this via MSBuild on the command-line isn’t as simple as invoking your project file with a particular target and setting some properties. You’ll need to do what VS2010 ought to have done: create a target yourself that performs the half-deploy then copies the results to the target folder. To edit your project file, right click on the project in VS2010 and click Unload Project, then right click again and click Edit. Scroll down until you find the Import element that imports the web application targets (Microsoft.WebApplication.targets; this file itself imports the Microsoft.Web.Publishing.targets file mentioned earlier). Underneath this line we’ll add our new target, called PublishToFileSystem:
<Target Name="PublishToFileSystem" DependsOnTargets="PipelinePreDeployCopyAllFilesToOneFolder">
    <Error Condition="'$(PublishDestination)'==''" Text="The PublishDestination property must be set to the intended publishing destination." />
    <MakeDir Condition="!Exists($(PublishDestination))" Directories="$(PublishDestination)" />

    <ItemGroup>
        <PublishFiles Include="$(_PackageTempDir)\**\*.*" />
    </ItemGroup>

    <Copy SourceFiles="@(PublishFiles)" DestinationFiles="@(PublishFiles->'$(PublishDestination)\%(RecursiveDir)%(Filename)%(Extension)')" SkipUnchangedFiles="True" />
</Target>
This target depends on the PipelinePreDeployCopyAllFilesToOneFolder target, which is what VS2010 calls before it does its manual copy. Some digging around in Microsoft.Web.Publishing.targets shows that calling this target causes the project files to be placed into the directory specified by the property _PackageTempDir.
The first task we call in our target is the Error task, upon which we’ve placed a condition that ensures that the task only happens if the PublishDestination property hasn’t been set. This will catch you and error out the build in case you’ve forgotten to specify the PublishDestination property. We then call the MakeDir task to create that PublishDestination directory if it doesn’t already exist.
We then define an Item called PublishFiles that represents all the files found under the _PackageTempDir folder. The Copy task is then called which copies all those files to the Publish Destination folder. The DestinationFiles attribute on the Copy element is a bit complex; it performs a transform of the items and converts their paths to new paths rooted at the PublishDestination folder (check out Well-Known Item Metadata to see what those %()s mean).
To call this target from the command-line we can now simply perform this command (obviously changing the project file name and properties to suit you):
msbuild Website.csproj "/p:Platform=AnyCPU;Configuration=Release;PublishDestination=F:\Temp\Publish" /t:PublishToFileSystem
Build Deployment Package
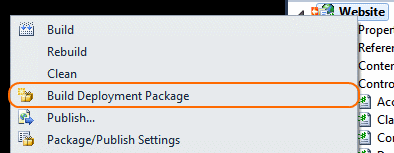
The VS2010 Build Deployment Package command
Thankfully, Build Deployment Package is a lot easier to do from the command line because Visual Studio doesn’t do any manual outside-of-MSBuild stuff; it simply calls an MSBuild target (as it should!). To do this from the command-line, you can simply call on MSBuild like this (again substituting your project file name and property values):
msbuild Website.csproj "/p:Platform=AnyCPU;Configuration=Release;DesktopBuildPackageLocation=F:\Temp\Publish\Website.zip" /t:Package
Note that you can omit the DesktopBuildPackageLocation property from the command line if you’ve already set it by setting something using the VS2010 Package/Publish Web project properties UI (setting the “Location where package will be created” textbox). If you omit it without customising the value in the VS project properties UI, the location will be defaulted to the project’s obj\YourCurrentConfigurationHere\Package folder.
Conclusion
In conclusion, we’ve seen how it’s fairly easy to configure your project file to support publishing your ASP.NET web application to a local file system directory using MSBuild from the command line, just like Visual Studio 2010 does (fairly easy once the hard investigative work is done!). We’ve also seen how you can use MSBuild at the command-line to build a deployment package. Using this new knowledge you can now open your project up to the world of automation, where you could, for example, get your continuous integration server to create deployable builds of your web application for you upon each commit to your source control repository.
